Homemade Sicilian Cannoli (shells and filling)
Updated Jan 18, 2022, Published May 12, 2021
This post may contain affiliate links. Please read our disclosure policy.

How to make authentic tasting Sicilian Cannoli at home! This recipe will show you how to make the best homemade cannoli shells that are crispy, sweet and delicious filled with a classic ricotta filling.
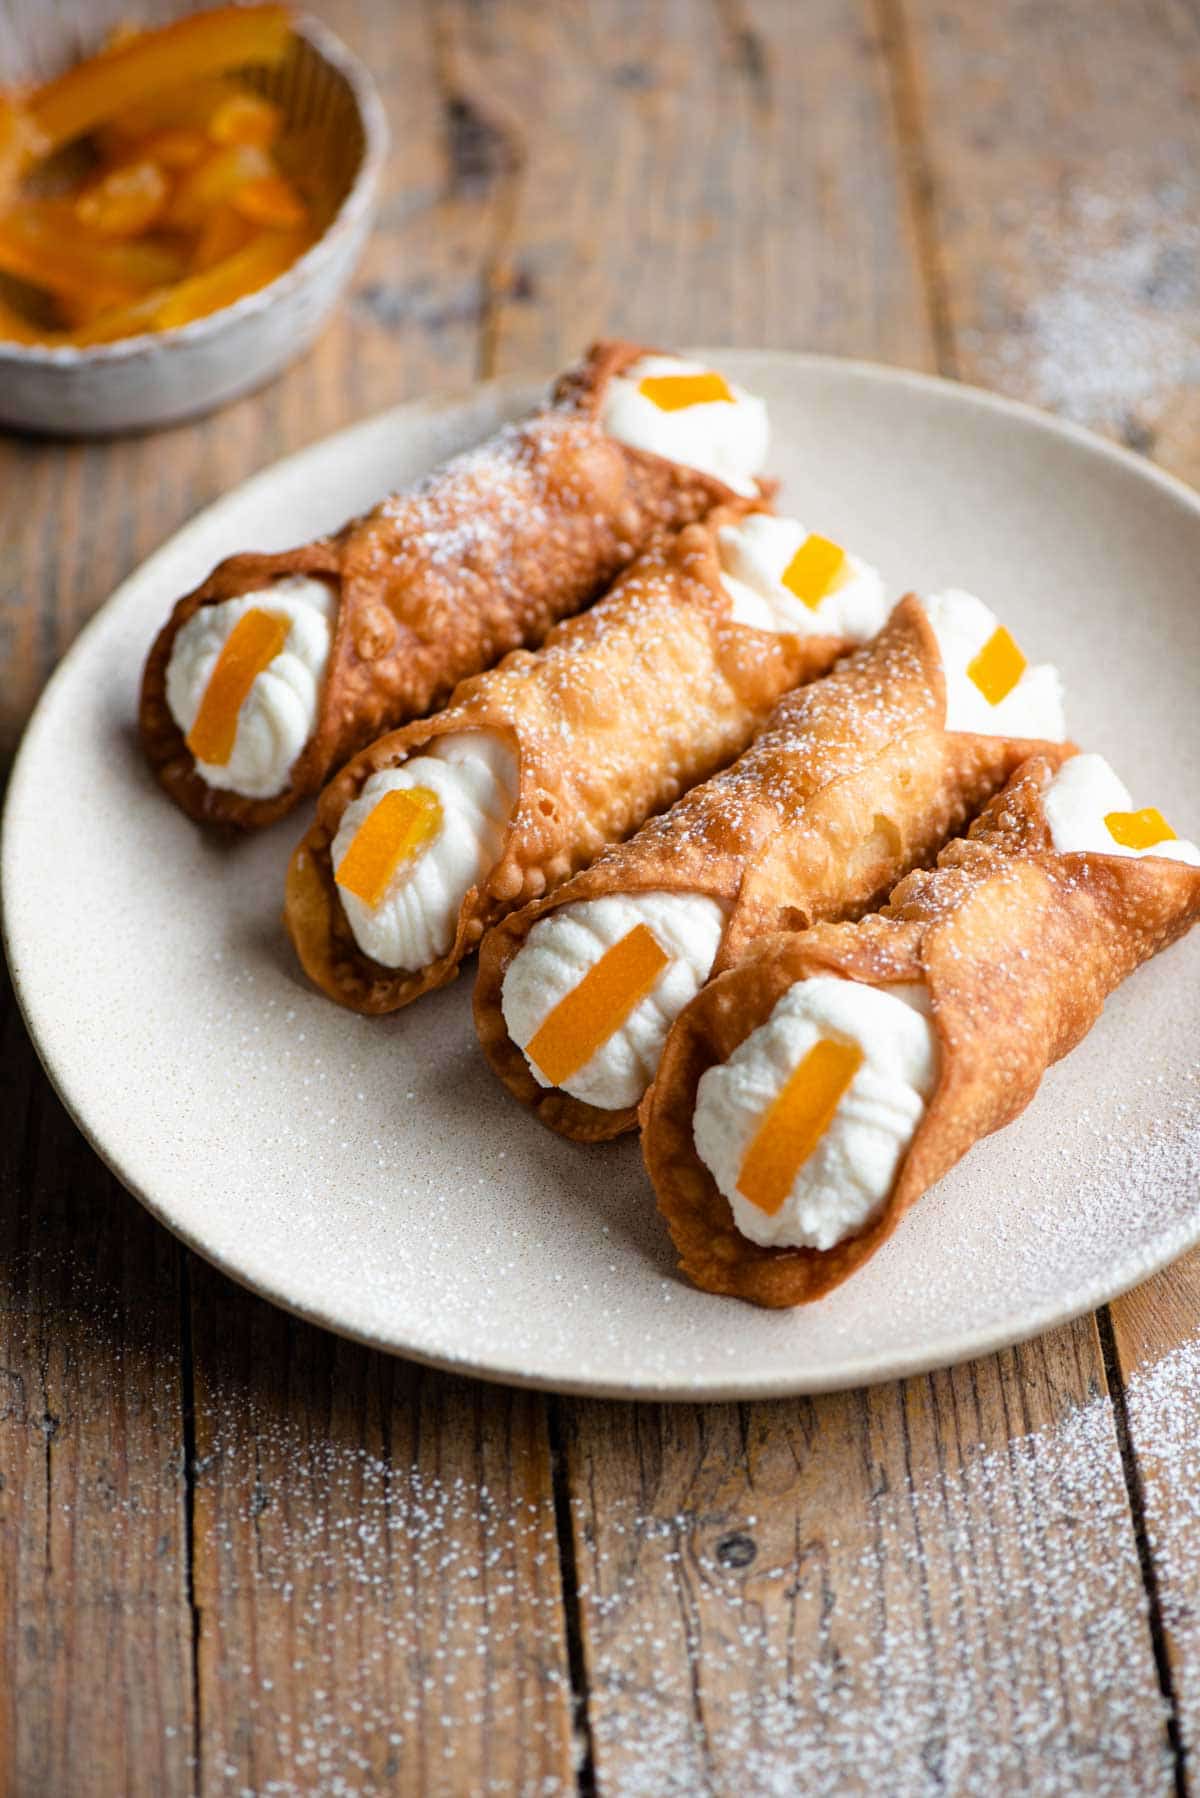
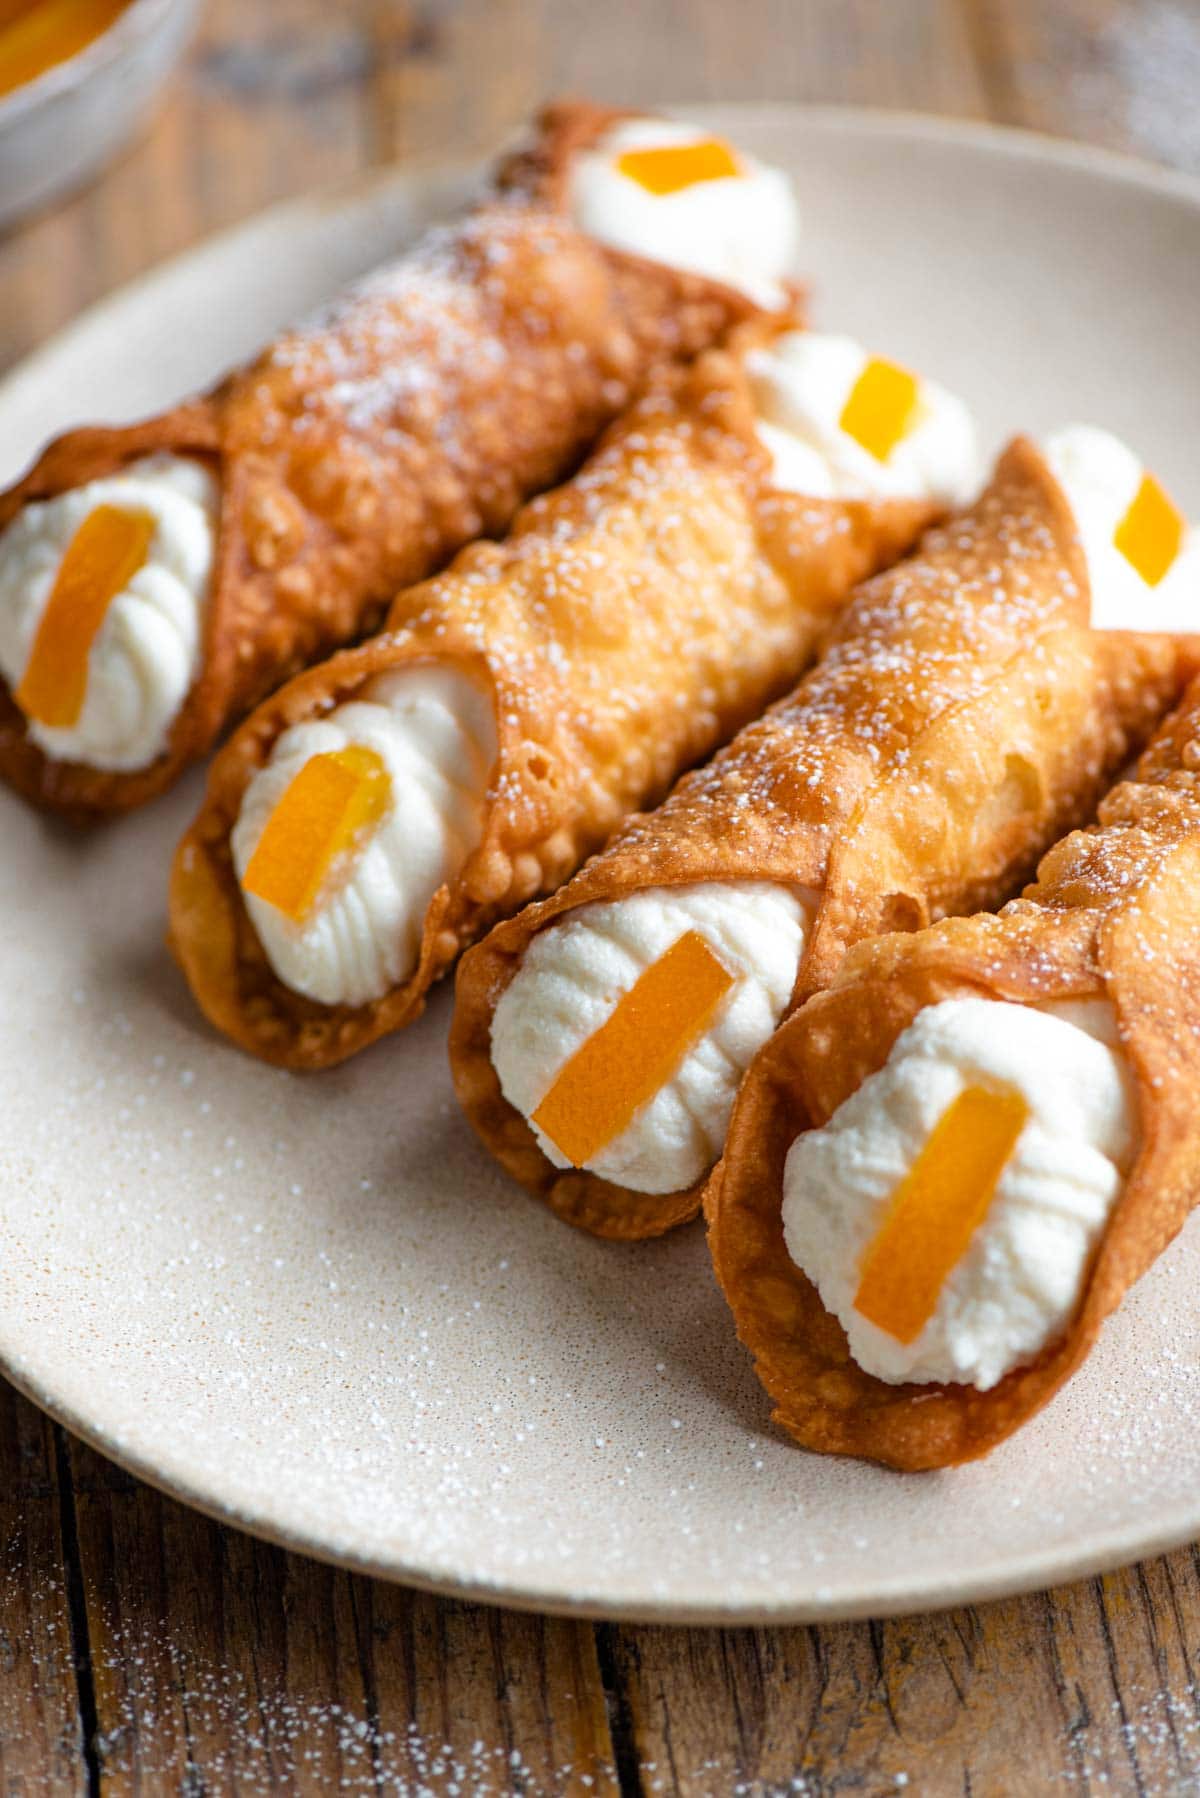
Is there anything better than freshly made cannoli? Crispy and flaky shells fried until bubbly and golden and filled with a classic sweet ricotta filling, pure dessert heaven!
Alongside Cassata and Minne di Sant’Agata, these pastries are one of Sicily’s most iconic desserts and can be found in Sicilian bakeries all over the world. Traditionally they’re garnished with candied orange peel at each end or chopped pistachio nuts (Bronte pistachios from Sicily if you can get them).
Cannoli, just like Bomboloni are a labour intensive dessert but they are SO worth the effort. They’re perfect for a special treat, to end a family feast or for occasions like Easter or Christmas.
Our recipe shows you how to make both the shells and filling from scratch. The shells are the most time-consuming part (but not difficult) and in my opinion, well worth making but if you’re short on time you can use the filling with store-bought shells.
Update: During a trip to Palermo we were lucky enough to visit Convento Santa Caterina. Inside the convent there is a bakery run by nuns and their cannoli are iconic. I’m so happy to say that our recipe is very similar and I didn’t want to make any changes to it after trying them.
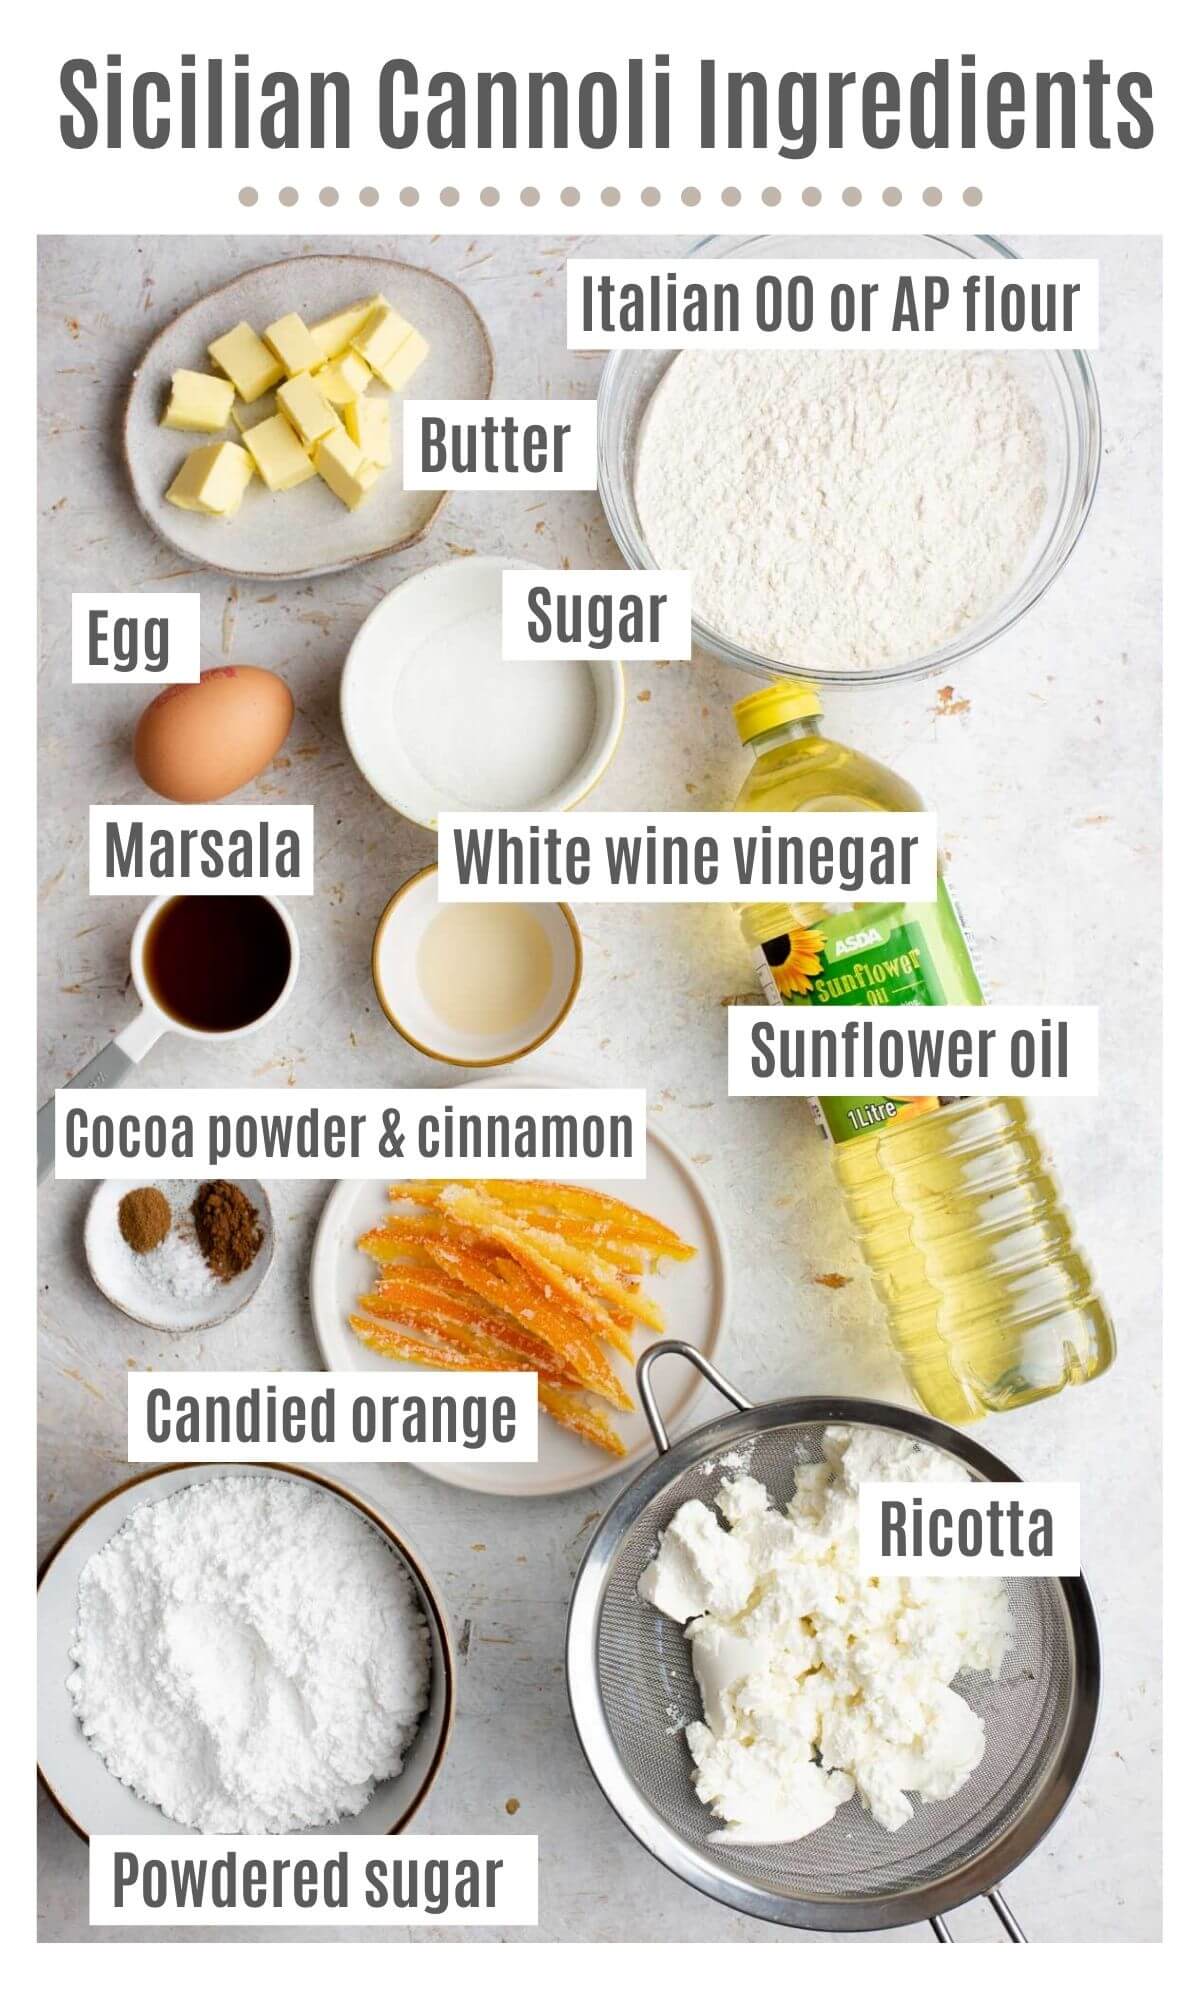
Ingredients – what you need
See the photo below that shows you everything you need to make homemade cannoli shells and filling plus some important notes on the ingredients.
Pin this now to find it later
Pin It- Italian 00 or AP flour – you can use either Italian 00 flour which is traditionally used or regular all-purpose flour.
- Sugar – white granulated or caster sugar will both work.
- Cocoa powder – a tiny amount is added for colour, if you don’t have any you can leave it out.
- Cinnamon – just a pinch is added for flavour.
- Butter – make sure your butter is cold straight from the fridge.
- Egg – make sure to use a large egg.
- Marsala wine – this is an important ingredient for flavour and sweetness. You can also use white wine.
- White wine vinegar – an important ingredient to help create light and crispy shells.
- Ricotta – you need a lot of ricotta (about 4 cups/1 kg) and it must be drained in advance or it’ll be too soft for filing.
- Powdered sugar – mixed into the ricotta for a delicious sweet flavour. You can easily adjust the amount to taste.
- Citrus zest – you can add the zest of a lemon or orange into the ricotta filling for extra flavour (optional).
- Candied orange peel – traditionally Sicilian cannoli are garnished with strips of candied orange at each end.
- Sunflower oil – for deep frying the shells. You can also use another flavourless oil such as vegetable oil.
Essential equipment
- Cannoli tubes – I use metal cannoli tubes, you can easily find them online.
- Candy thermometer – it’s SO important to know the temperature of your oil and keep it consistent. Too hot or cold will affect the end result.
- Pasta machine or rolling pin – a pasta machine makes things easy but you can also use a rolling pin to roll your dough.
- Kitchen paper – you need to drain the cannoli shells after frying to remove any excess oil.
- Tongs – you need tongs to add and remove the cannoli from the oil.
Visual walk-through of the recipe
See a visual walk-through of the recipe below with helpful step-by-step photos. The full written recipe plus all our top tips is in the recipe card below.
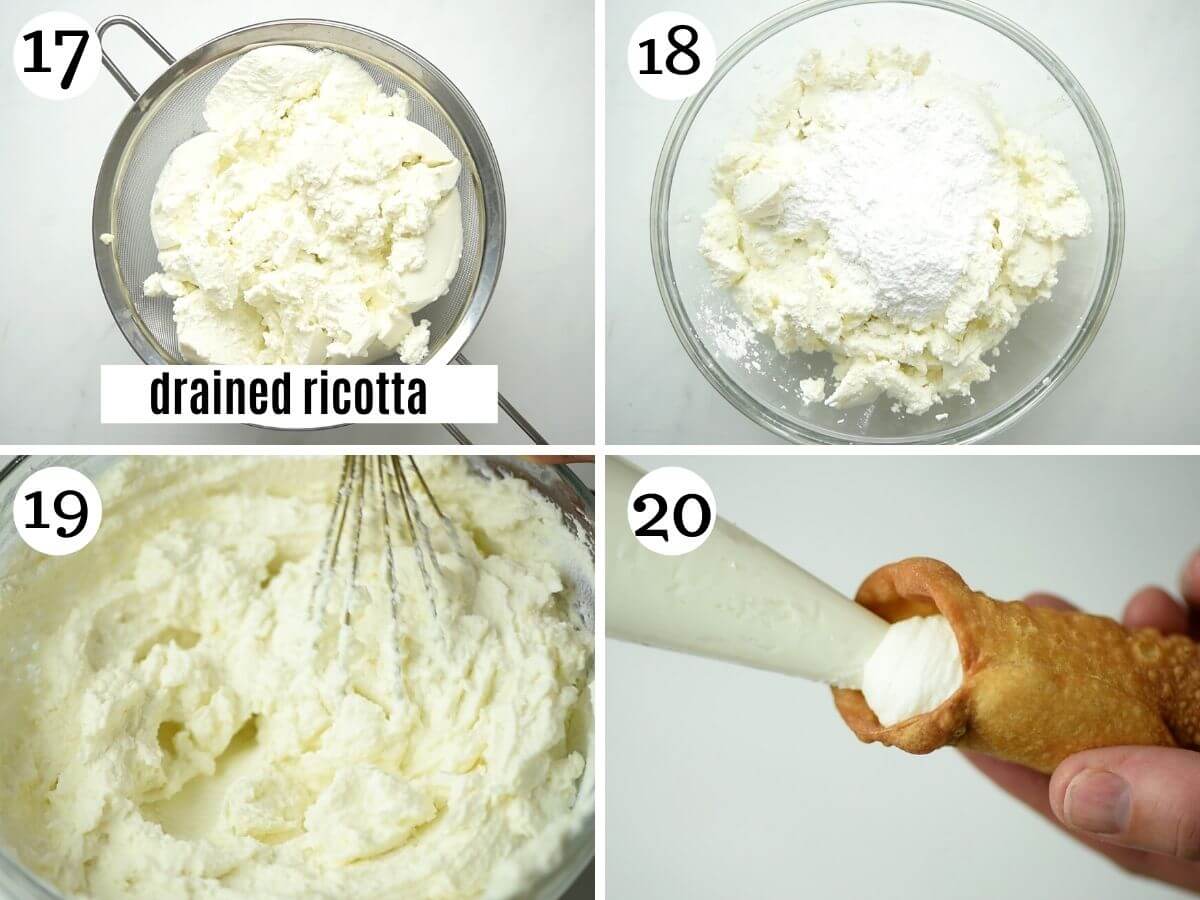
Important Tip! Before starting, place the ricotta in a sieve over a bowl and store it in the fridge for at least 4 hours or overnight if possible. It’s important to drain the ricotta or it’ll be too soft for filling the cannoli once mixed with the sugar.
Making the cannoli dough
Add the flour, sugar, cinnamon and cocoa powder to a large bowl and mix together until thoroughly combined (photo 1).
Cut the cold butter into cubes then work it into the flour mixture with your finger until it resembles breadcrumbs (photos 2 & 3).
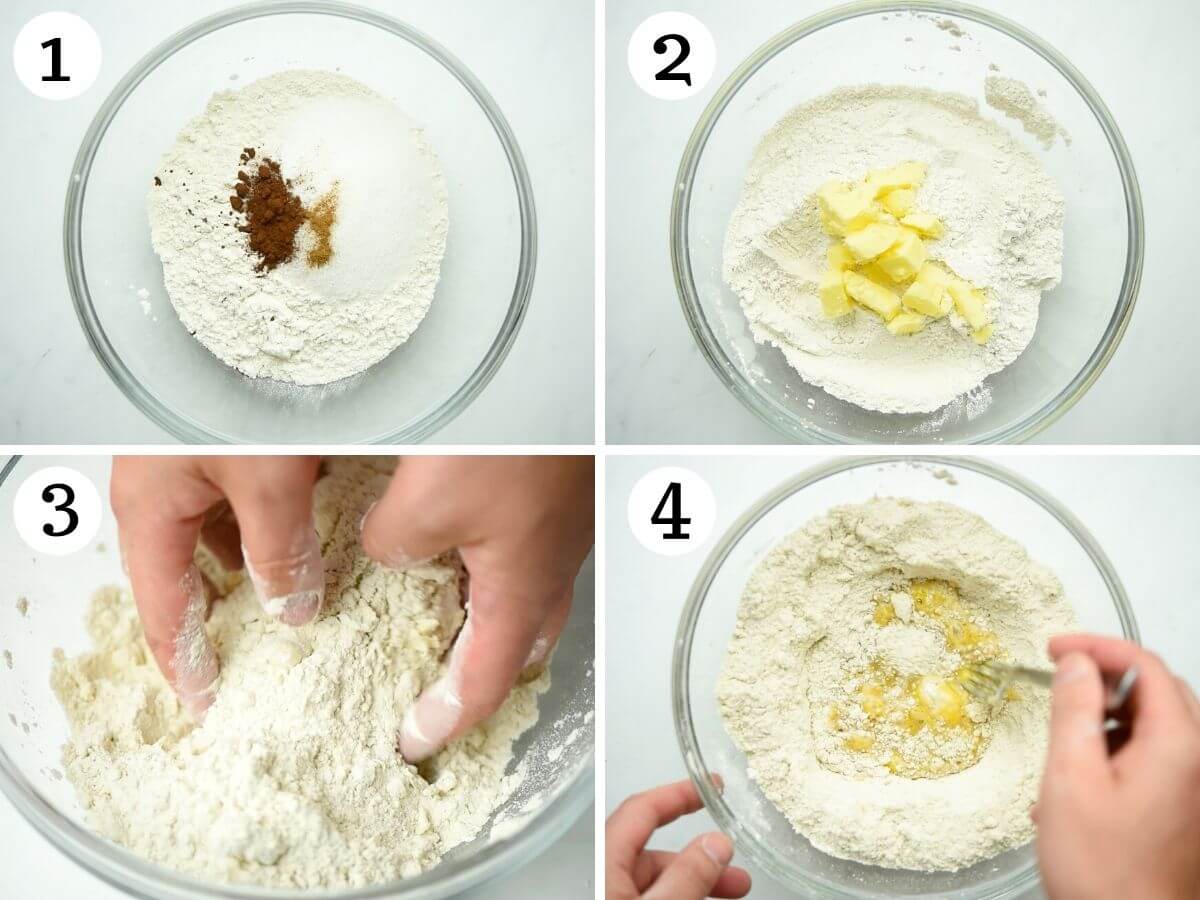
Make a well in the middle of flour and add the beaten egg, vinegar and marsala. Mix everything together with a fork until a rough dough forms (photo 4).
Tip the dough onto a clean work surface and knead for 7-10 minutes. This is the secret to getting all those bubbles in your cannoli shells (photo 5).
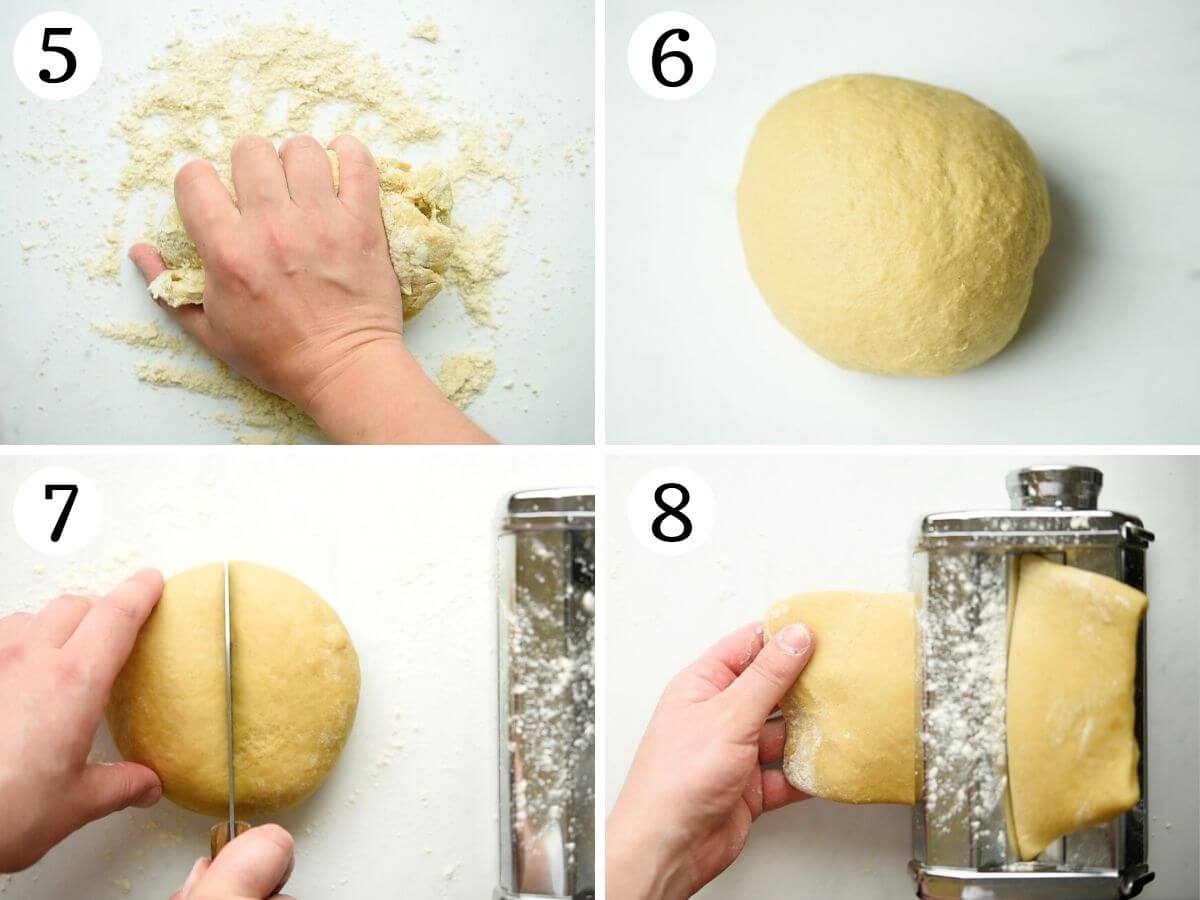
Once kneaded, wrap the dough in plastic wrap and let it chill in the fridge for 30 minutes to 1 hour. Alternatively, you can leave the dough overnight (photo 6).
Set up your pasta machine then heat a large pot of oil to 356F (180C) using a candy thermometer.
Lightly dust your work surface and pasta machine with flour. Cut your dough in half then flatten your ball of dough so it can fit through the widest setting of your pasta machine (usually number 0) (photo 7).
Rolling out the dough
Pass the dough through the widest setting then fold one end of the dough over the other (photos 8 & 9). Pass the dough through the widest setting again and repeat 3-4 times (photo 10).
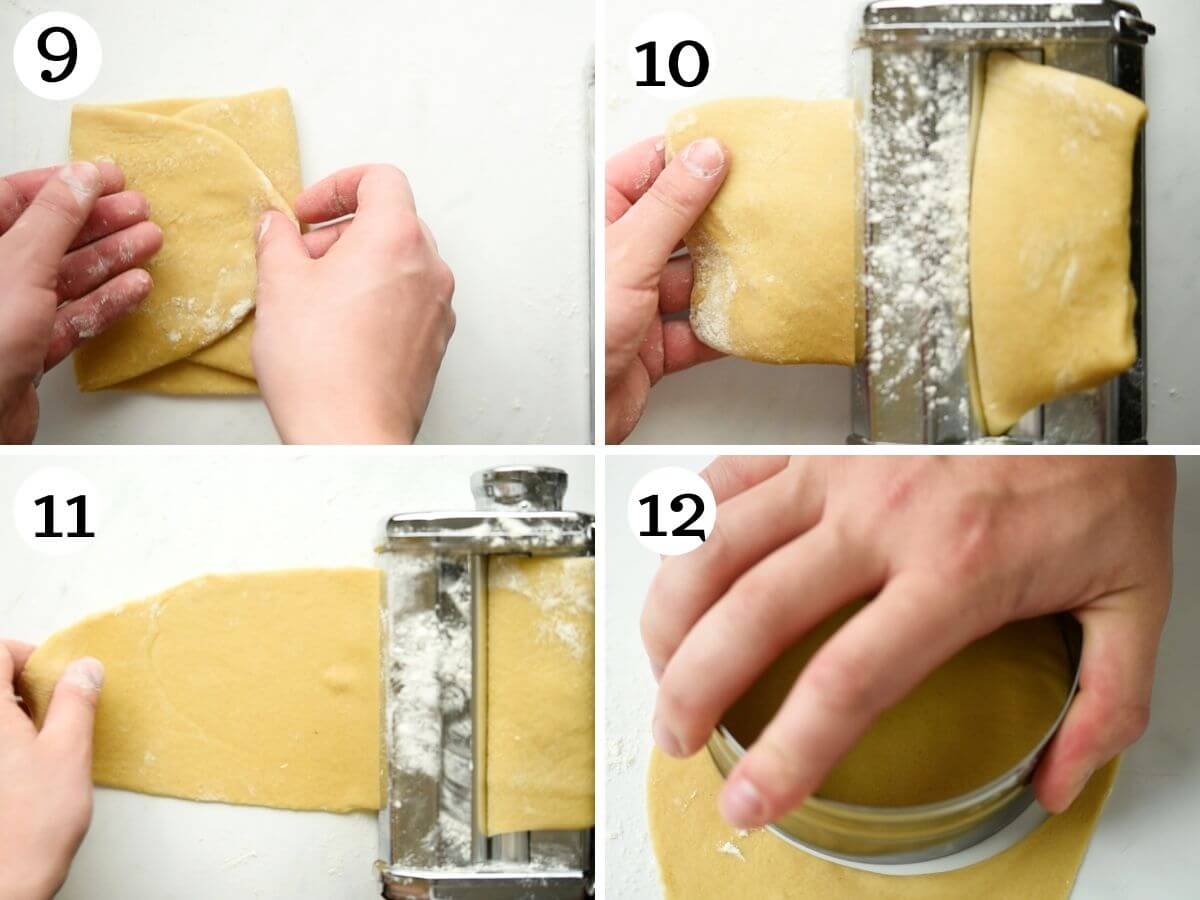
Now your dough is ready for rolling, pass the dough through the second widest setting (usually number 1) and continue until the dough is half ⅛ inch thick (2mm). If using a Marcato Atlas pasta machine this is number 6 (photo 10 & 11).
Rolling pin method (optional)
If you don’t have a pasta machine you can simply roll the dough out with a rolling pin on a light floured surface until very thin (⅛ inch if possible).
Shaping
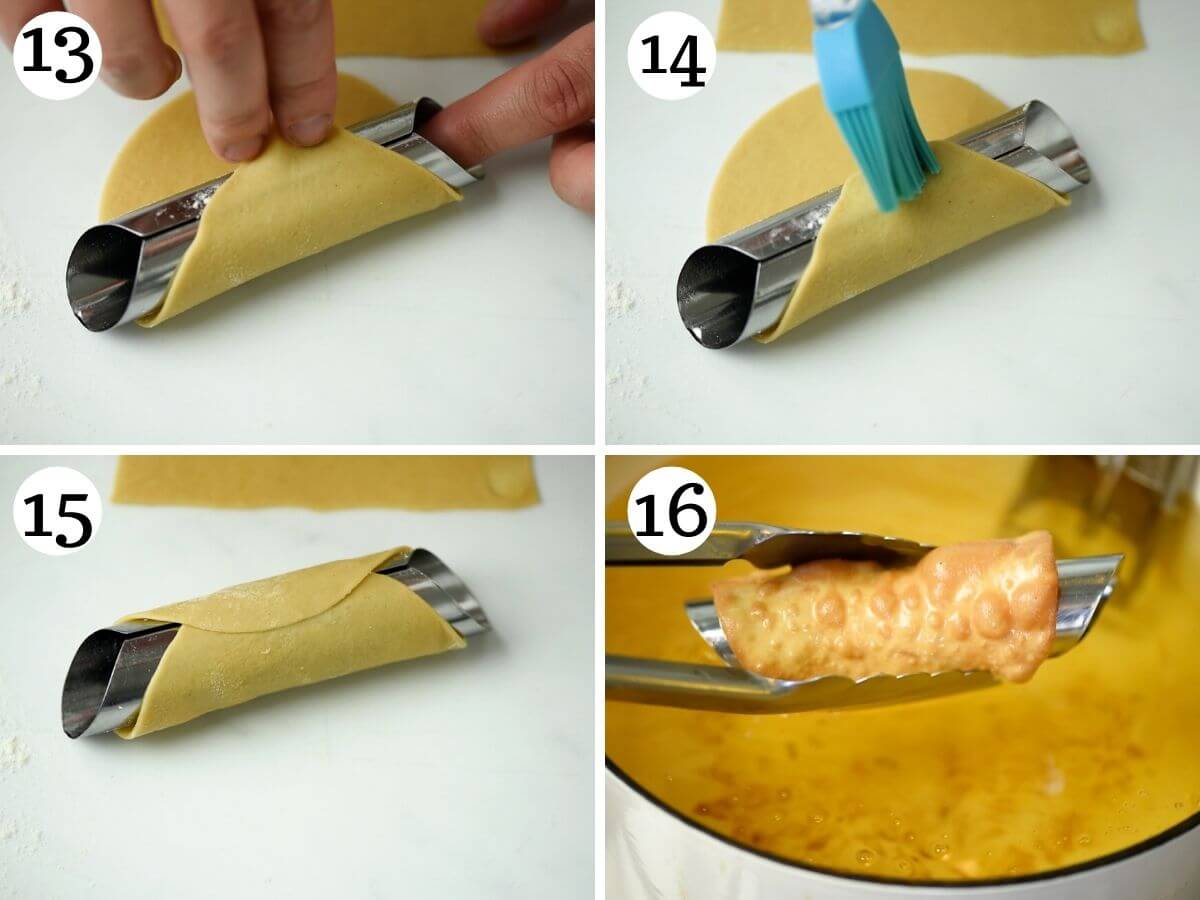
Cut out rounds using a 4-5 inch round cutter (you can make them smaller or bigger if you like). Working in batches, wrap the cut-out dough around a cannoli tube using a tiny dot of egg white to seal (photos 12-14).
Carefully, fry the cannoli in the hot oil (in batches) until golden brown and puffed up. Drain on kitchen paper. If you don’t have many cannoli tubes, be careful they aren’t too hot before re-using (photo 15 & 16).
How to make the filling
Put the drained ricotta and powdered sugar in a mixing bowl and mix together until combined (photos 17-19).
Fill a piping bag with the mixture and pipe it into the cannoli shells. Add a slice of candied orange to each end, serve (photo 20).
Filling options and variations
There are many ways to fill your homemade cannoli, I like the not overly sweet ricotta just with a hint of orange or lemon zest mixed in but you can also fold in chocolate chips, chopped up candied fruit or nuts.
You can also dip the ends of the cannoli shells in melted chocolate just like I did in our mini cannoli recipe. Then you can dip the ends in chopped nuts like pistachios or hazelnuts.
FAQs
You must knead the dough for around 10 minutes just as you would with pasta dough. It creates tiny little bubbles throughout the dough that bubble up when fried.
You can prepare everything in advance (store the filling in the fridge) but do not fill the cannoli more than 30 mins to 1 hour before serving or the shells will soften too much.
The cannoli shells will keep well for 1-2 weeks in a sealed container
If you follow our recipe your cannoli shells will be extra crispy and crunchy but make sure you fill them right before serving (I like to keep a piping bag filled in the fridge). If you fill them too far in advance they will start to turn soggy.
More Italian desserts you might like
- Cenci di Carnevale (Chiacchiere, Crostoli, Bugie) Italian Fried Pastries
- Struffoli – Italian Honey Balls
- Tiramisu – Authentic Recipe!
- Crostata di Frutta (Italian Fruit Tart)
- White Chocolate Panna Cotta
- Pignoli Cookies (Biscotti ai Pinoli)
If you’ve tried this Cannoli recipe or any other recipe on the blog then don’t forget to rate the recipe and let me know how you got on in the comments below, I love hearing from you! You can also FOLLOW US on FACEBOOK, INSTAGRAM and PINTEREST or sign up to our NEWSLETTER to see more of our delicious food
Step By Step Photos Above
Most of our recipes come with step by step photos, helpful tips and tricks to make it perfectly first time and even video!
Homemade Sicilian Cannoli

Equipment
- Cannoli tubes, for shaping
- Pasta machine or rolling pin
- Candy thermometer
- Kitchen paper, for draining
Ingredients
- 1 3/4 cups plus 1 tablespoon Italian 00 flour or all-purpose flour, (250g)
- 4 tbsp cold butter, (55g)
- 1 large egg, beaten (plus 1 egg white for sealing the cannoli)
- ¼ cup sugar, (50g) granulated or caster sugar
- ¼ cup marsala, (60ml)
- Pinch of cinnamon
- ½ tsp cocoa powder
- 1 tbsp white wine vinegar
- Sunflower oil, for frying
Filling
- 4 cups ricotta, drained (1 kg)
- 1 cup powdered sugar
- zest of 1 lemon or orange, (optional)
- Candied orange, nuts or chocolate chips
Instructions
- Before starting, place the ricotta in a sieve over a bowl and store it in the fridge for at least 4 hours or overnight if possible. It’s important to drain the ricotta or it’ll be too soft for filling the cannoli.
Making the cannoli dough
- Add the flour, sugar, cinnamon and cocoa powder to a large bowl and mix together until thoroughly combined.
- Cut the cold butter into cubes then work it into the flour mixture with your finger until it resembles breadcrumbs.
- Make a well in the middle of flour and add the beaten egg, vinegar and marsala. Mix everything together with a fork until a rough dough forms.
- Tip the dough onto a clean work surface and knead for 7-10 minutes. This is the secret to getting all those bubbles in your cannoli shells.
- Once kneaded, wrap the dough in plastic wrap and let it chill in the fridge for 30 minutes to 1 hour. Alternatively you can leave the dough overnight.
Rolling out the dough
- Set up your pasta machine then heat a large pot of oil (2-3 inches deep) to 356F (180C) using a candy thermometer.
- Lightly dust your work surface and pasta machine with flour. Cut the dough in half then flatten one half of the dough so it can fit through the widest setting of your pasta machine (usually number 0).
- Pass the dough through the widest setting then fold one end of the dough over the other (see photos 7 & 8). Pass the dough through the widest setting again and repeat 3-4 times.
- Now your dough is ready for rolling, pass the dough through the second widest setting (usually number 1) and continue until the dough is half of ⅛ inch thick (2mm). If using a Marcato Atlas pasta machine this is number 6.
Rolling pin method (optional)
- If you don’t have a pasta machine you can simply roll the dough out with a rolling pin on a light floured surface until very thin (2mm or half of ⅛ inch if possible).
Shaping
- Cut out rounds using a 4-5 inch round cutter (you can make them smaller or bigger if you like). Working in batches, wrap the cut out dough around a cannoli tube using a tiny dot of egg white to seal.
- Carefully, fry the cannoli in the hot oil until golden brown and puffed up. Drain on kitchen paper. If you don’t have many cannoli tubes, be careful they aren’t too hot before re-using.
Make the filling
- Put the drained ricotta and powdered sugar in a mixing bowl and mix together until combined. Fill a piping bag with the mixture and pipe it into the cannoli shells. Add a slice of candied orange to each end, serve.
Filling options
- You can fold chocolate chips into the ricotta if you like or sprinkle nuts on the ends instead of candied orange.
Video
Notes
- Measuring your flour – if you are using cups instead of a kitchen scale make sure to spoon the flour into the cups and level it off with a knife for best results.
- Resting the dough – make sure you let the dough rest in the fridge to let the gluten relax before rolling out (30 mins to 1 hour).
- Rolling out the dough – it’s important that you roll the dough out very thin or the shells will be too thick and soft instead of crispy.
- Size and shape of the cannoli – I find that a 4-5 inch round cutter works best but if you don’t have one you can cut the dough into squares instead.
- Sealing the edges – use a small amount of egg white to seal the edges of the dough but be careful not to get it on the cannoli tubes or the dough will stick to them.
- Fry in batches – don’t add too many cannoli to the oil at once of the oil will cool down. You also don’t want to overcrowd the pan.
- Prepare in advance – You can prepare everything in advance (store the filling in the fridge for up to 3 days) but do not fill the cannoli more than 30 mins to 1 hour before serving or the shells will soften too much.
- Leftovers – leftover cannoli shells will keep well in an airtight container for about 2 weeks.
Helpful Info for All Recipes
- I always use extra virgin olive oil in all of my recipes unless stated otherwise
- When I use canned or jarred tomatoes of any kind I always use Cirio or Mutti brands for the best results and flavour.
- All vegetables are medium sized unless stated otherwise
- All recipes are tested and developed using a fan (convection) oven
- Find out more about how nutrition is calculated.
- Check out our must have Italian Pantry Staples.
- You can also find all our Essential Kitchen Tools for Italian Cooking.
Nutrition
Nutrition information is automatically calculated, so should only be used as an approximation.


I made this recipe.
Im not pleased with the shell.
The only way I’ll make it again is with a pasta maker. Its almost impossible to get the dough thin enough to get it crispy. Half of mine came out chewy. It was a great deal of work for disappointment 😞
Perfect shell recipe. I followed instructions and monitored the temperature of the oil. I rolled these out using my KitchenAid pasta roller and worked my way down to the thinnest setting. The end product was the lightest, crispiest, most delicate cannoli shell I’ve ever had. My search for a cannoli shell recipe is over. Thank you for this recipe.
Top notch recipe. I you follow the instructions how can you fail? Mine turned out perfectly yet again. I wish I could post a photo of how they turned out.
Your comment is awaiting moderation.
Excellent. Very similar to my mom’s recipe (from Sicily). My mom used shortening instead of butter, whiskey instead of Marsala and does not use vinegar or cocoa powder. I was curious to see how your recipe compared to hers. I didn’t have Marsala so I used whiskey. Classic smell of my moms dough and I’m glad I used it. Memories came flooding back. That was the only change I made to your recipe. First off, dough texture was spot on and very easy to work with. I’m not sure the cocoa powder made any difference so I may just leave that out next time since I couldn’t detect it on taste. Did I say I loved working with this dough?
Anyway, my Mercato pasta setting only goes up to 7. I ran it through 1 (widest setting on my machine) 2 times then once on each setting and stopped at 6. Perfecto!! Perfect thickness and the dough was fantastic to roll. 😃
Now, the only other difference my mom and sister do is they cut the dough in 3” squares. That’s how I grew up making our shells but I decided to dog out my round cutter and try that. I actually liked working with the circle.
This dough is amazing.
Next, I used my little fry daddy. Put 2-3 in at a time. My first two or three batches were a little dark. It had been a while since the last time I made these, like 30 years. If anyone wants to know, 40-42 seconds in the fry daddy was the magic number. Beautiful light golden color and the shells were perfectly bubbled all over. I was so proud of myself. I’ve only ever made them with my mom.
I used my brothers filling recipe so I can’t rate that but when it was time to serve, I filled with both custard and ricotta filling and dipped in sprinkles and crushed roasted pumpkin seeds.
These shells did not disappoint. Delicate and flaky. Beautiful flavor and looked and tasted just like my moms. I could not tell a difference. This is my new recipe as I’d prefer butter or shortening. Merry Christmas and Happy New Year.
Hi Vicki,
I enjoyed your comments about the cannoli recipe. Your recipe for the filling is identical to my mother’s recipe. I thought she was the only one in the world who added homemade custard (half amount of liquid to make it stiffer) to the cheese mixture. Diced candied cherries and a pinch of cinnamon. 2023 was the last time I made cannolis. Now I’m excited to make them again!
My dough is not forming. What could I have done wrong?
I’ve made cannoli several times, including at a cooking course in Sicily. This is the most successful recipe I have tried. The shells were perfectly bubbly and crisp, just like the best Sicilian ones. Thank you for the recipe and method.
We often buy cannoli, and really wanted to be able to make them at home. I was excited about trying to make this recipe but was really disappointed by the results. Although the cannoli were quite easy to prepare in our pasta machine and seemed to cook well, though extremely quickly – they tasted too fatty and greasy, like doughnuts and were soft, almost soggy, and not crisp and biscuit like, as the ones we buy are. They were pretty inedible and we threw them out. I don’t know if we did something wrong – but as far as I can see, we followed the recipe, and we only cooked 1 or 2 cannoli at a time. They looked exactly right with bubbles all over and a nice golden brown. I am reluctant to try again as it’s such a time consuming process and we wasted 1kg of ricotta filling. This recipe is detailed in many ways but gives no tips about the actual cooking of the cannoli – how long should they be in the oil, for instance? How do you keep the oil at the right temperature? Why did they have a noticeable oily taste and how do we avoid this? We used sunflower oil as advised and each one took less than a minute to cook. Should we have cooked them longer – but surely this would have made them soggier, not crisper? We wondered about the oil temperature, which might have been too hot, as they were cooking so fast – would a lower temperature work better? Any advice? Thanks and regards
Hi Juliet, so sorry to hear you had difficulties making the cannoli. It sounds like the dough was maybe too thick and the oil wasn’t at the correct temperature so they were browning too quickly on the outside but not fully cooked inside making them soggy?
On instruction number 1 of ‘rolling out the dough’ I say to heat the oil to 180C (365F) using a candy thermometer. It’s really important to use one when frying so you can monitor the temperature to make sure it doesn’t get too hot (or not hot enough). I’ll add that instruction again further down in the recipe to make it clearer. Hope this helps!
Haven’t made the recipe yet but the final dough thickness conversions are too wrong too ignore. One eighth of an inch thick is more like 3mm – way more than the 0.5mm mentioned. An eighth of a inch, too too thick I reckon. May explain the uncooked dough. Go much thinner! Thanks Emily for the recipe
Yes there are things you need to experiment and figure out for yourself… you definitely had shells that were way too thick.
I added slightly more wine (any delicious red wine will do) and maybe an extra tbsp of butter. We made ours vegan and they turned out fantastic.(vegan butter, vegan ricotta, just egg etc.)
You need to roll dough out very thin and laminate (fold and roll) it many times to get the light and flakey bubbles.
Oil temp is a tricky on as i didnt have a thermometer. I would say as soon as you see the slightest bit of smoke it’s too hot. You wand a good amount of rapid ripples in the oil. Test with a chunk of dough. We only fried for 25-35 seconds while holding them down with a handled fry spoon because the bubbles were floating them to the top. I only did 1 or 2 at a time. On a Cuisinart pasta machine I rolled out to a 6. I cut it into roughly 4×4″ squares and used just egg to seal. Metal tubes work best as they help cook the inside of the shell ensuring crispness.
It really takes some time to dial it in and know what you like. It helpsnto be italian and have tried maaany cannolis in your life and in travles. I dialed back the sugar in the ricotta filling quite a bit. If making non vegan and cheese from scratch- a mix of sheeps milk and goats milk ricotta is best.Always drain and strain ricotta. You want dry and fluffy texture- the sugar wets the filling a bit adding to the chances of a soggy shell. Hope this helps.
I believe 1 1/3 cups flour is more like 160g not 250.
Thanks for spotting that Tony. It was meant to say 1 and 3/4 cups. I just re-weighed the flour into cups and have updated the recipe!