Pistachio Crusted Chicken with Arugula Salad
Updated Sep 08, 2020, Published Feb 05, 2020
This post may contain affiliate links. Please read our disclosure policy.

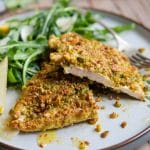

Juicy and delicious Pistachio Crusted Chicken served with a simple arugula and parmesan salad. This easy and healthy chicken recipe is naturally low carb with no breadcrumbs or flour involved and tastes incredible!

This is hands down my flavourite way to serve chicken cutlets, I mean the flavour from the pistachios is insane!
The outside is nutty, crispy and crunchy with juicy tender chicken inside. It’s easy enough to knock up on busy weeknights but elegant and special enough to serve at weekends or at dinner parties!
Did you notice I said there is no breadcrumbs or flour involved? Oh yes, this pistachio crusted chicken is naturally low carb and healthy too!
Living in Italy I came across a method for breading chicken that is so incredibly simple you’ll wonder why you ever did it any other way!?
It’s the same method I used for my Breaded Chicken Cutlets Recipe – No Flour No Egg which is super popular and much loved by our readers, make sure to check it out if you’re interested in using regular breadcrumbs.
Check out our full step by step photos, instructions and video below to learn how to make this tasty pistachio chicken using the easiest method ever!
P.S If you love pistachios as much as I do then make sure to check out our Stuffed Pork Tenderloin with Prosciutto and Pistachios recipe, it’s stuffed with sausage and mushrooms, tastes incredible and is super impressive!
Here’s What You Need to Make it
Ingredients
- Olive oil – just regular olive oil for frying there’s no need to use extra virgin olive oil
- Chicken breasts – Make sure they’re skinless and boneless, I always go for organic and free-range chicken but it’s a personal preference.
- Pistachios – shelled and unsalted.
- Lemon wedges – for serving, a little lemon juice is delicious!
- Arugula & Parmigiano Reggiano (optional) – I love peppery arugula or rocket with a little lemon and parmesan shavings it’s a perfect side to this dish but of course you can choose any sides you fancy.
Equipment
- Plastic wrap (cling film) & rolling pin – these are used to beat the chicken into thin cutlets which not only makes them tender but cuts the cooking time right down!
How to Make Pistachio Crusted Chicken – Step by Step
Put the pistachios in a food processor and blitz to a fine crumb lay them out on a large plate and set aside (photos 1-2).
Next, cut the chicken breasts in half lengthways and season with a sprinkling of salt (photos 3-4).

Pin this now to find it later
Pin ItPlace them between two sheets of plastic wrap and beat with a rolling pin until 1/4 inch (1/2cm) thick (photo 5).
One by one press the chicken cutlets into the blitzed pistachios until completely covered and set aside ready for frying (photo 6).

Heat olive oil in a large skillet or frying pan and fry the chicken cutlets for 4 minutes on each side, you may need to do this in batches depending on how large your skillet is (photos 7-8).
Top Tip: heat your oven on low if you need to fry the chicken in batches and keep the first batch warm while you do the rest.
Toss some arugula or rocket with a little olive oil, squeeze of lemon and serve on plates topped with shavings of parmesan, serve with the chicken.
Will the pistachios stick to the chicken without egg?
Absolutely, this is a method I’ve used for years now using either nuts or breadcrumbs and they stick perfectly without any extra help. I actually prefer it to using egg and flour because it’s much lighter.
There are a few things to bear in mind when using this method; the crumbs need to be dry so avoid using any olive oil or oil or any kind and don’t be tempted to add anything that will add moisture to the crumbs.
If you do then you’ll need something to help the crumbs stick like brushing the chicken lightly with mustard first, of course, this will also completely change the flavour.
Make pistachio chicken tenders or goujons
You can follow this recipe in the exact same way but instead of using chicken breasts you can use chicken tenders or goujons. Because they are small strips of chicken there’s no need to beat them first just simply roll them in the blitzed pistachios.
It’s a fun way to serve this chicken to kids or when feeding a crowd!
Serving suggestions and great sides to try
Arugula, parmesan and lemon is my go to simple side salad not only for this recipe but it’s something that goes with almost everything, I love it. Here are other delicious sides that would go just as well;
- White Bean Mash With Rosemary And Lemon
- Easy Green Bean Salad with Mustard and Garlic Dressing
- Italian Roast Potatoes – Rosemary And Garlic
- Zucchini Ribbon Salad

Top tips for making Pistachio Crusted Chicken
- Don’t over blitz the pistachios or the natural oils will start to release and it’ll start to turn into a paste.
- Make sure the pistachios are not too chunky either or they won’t stick so easily, see the step by step photos and video for reference.
- Beat the chicken to around 1/4 inch thick (they don’t have to be perfect) so they cook evenly and quickly.
- Make sure your skillet or pan isn’t too hot before adding the chicken or the nuts will burn before the chicken is cooked through.
- I love how simple this recipe is but you can easily add some chopped herbs, spices or even citrus zest to the pistachio crumbs to change it up!
- Got leftovers? store the chicken in a sealed container in the fridge for up to 3 days and reheat in a skillet until crispy or eat at room temperature with salad. Leftovers can also be frozen for up to 3 months.
- This recipe serve 4 with one breaded cutlet each, double the recipe for 2 pieces each.
Other delicious recipes you might like
- Stuffed Pork Tenderloin with Prosciutto & Pistachios
- Creamy Tuscan Chicken with Garlic & Pancetta
- Italian Chicken Cutlets with Pesto and Spinach
- Breaded Chicken Cutlets – No Flour No Egg
- Baked Chicken Meatballs in a Rich Tomato Sauce
If you’ve tried this Pistachio Crusted Chicken or any other recipe on the blog please let me know how you got on in the comments below, I love hearing from you! You can also FOLLOW ME on FACEBOOK, INSTAGRAM and PINTEREST to see more delicious food and what I’m getting up to.
Step By Step Photos Above
Most of our recipes come with step by step photos, helpful tips and tricks to make it perfectly first time and even video!
Pistachio Crusted Chicken

Ingredients
- 3-4 tbsp olive oil
- 2 chicken breasts, skinless and boneless
- 1 cup unsalted shelled pistachios, (120g)
- Salt
- Lemon wedges, for serving
Optional Side
- 4 large handfuls arugula, rocket
- 1-2 tbsp olive oil
- A small squeeze lemon juice
- Parmesan shavings
Instructions
- Put the pistachios in a food processor and blitz to a fine crumb lay them out on a large plate and set aside.
- Next, cut the chicken breasts in half lengthways and season with a sprinkling of salt.
- Place them between two sheets of plastic wrap and beat with a rolling pin until 1/4 inch (1/2cm) thick.
- One by one press the chicken cutlets into the blitz pistachios until completely covered and set aside ready for frying.
- Heat olive oil in a large skillet or frying pan and fry the chicken cutlets for 4 minutes on each side, you may need to do this in batches depending on how large your skillet is. Add a little extra olive oil if it’s fully absorbed.
- Heat your oven on low if you need to fry the chicken in batches and keep the first batch warm while you do the rest.
- Toss some arugula or rocket with a little olive oil, squeeze of lemon and serve on plates topped with shavings of parmesan, serve with the chicken.
Video
Notes
- Don’t over blitz the pistachios or the natural oils will start to release and it’ll start to turn into a paste.
- Make sure the pistachios are not too chunky either or they won’t stick so easily, see the step by step photos and video for reference.
- Beat the chicken to around 1/4 inch thick (they don’t have to be perfect) so they cook evenly and quickly.
- Make sure your skillet or pan isn’t too hot before adding the chicken or the nuts will burn before the chicken is cooked through.
- I love how simple this recipe is but you can easily add some chopped herbs, spices or even citrus zest to the pistachio crumbs to change it up!
- Got leftovers? store the chicken in a sealed container in the fridge for up to 3 days and reheat in a skillet until crispy or eat at room temperature with salad. Leftovers can also be frozen for up to 3 months.
- This recipe serve 4 with one breaded cutlet each, double the recipe for 2 pieces each.
Helpful Info for All Recipes
- I always use extra virgin olive oil in all of my recipes unless stated otherwise
- When I use canned or jarred tomatoes of any kind I always use Cirio or Mutti brands for the best results and flavour.
- All vegetables are medium sized unless stated otherwise
- All recipes are tested and developed using a fan (convection) oven
- Find out more about how nutrition is calculated.
- Check out our must have Italian Pantry Staples.
- You can also find all our Essential Kitchen Tools for Italian Cooking.
Nutrition
Nutrition information is automatically calculated, so should only be used as an approximation.


This made the best chicken ever! So simple and the chicken was very tender and moist. Great recipe, thank you.
So happy you enjoyed it, we love it too!
I was cleaning out my freezer and found an unopened bag of pistachios! Before I eat them all while working at my desk I’m making this!!! YUM!
Yay! This is the perfect way to use them up, hope you enjoy it!
This Chicken looks so amazing! I love that you chose to use Pistachios as the breadcrumbs! Such a nice addition!
Thanks so much!
These are so delicious! Pistachios are quite costly here, but well worth buying to make this chicken! We just love it! I’ll be making them again and again!
Yeah, most nuts are pretty pricey here too, I love making this when I want something a little extra special! Thanks so much Beth!
Love this recipe! So simple and also elegant. Arugula is my favorite green, so I love this recipe.
Thanks so much Marsha!
Just ran to the grocery store to pick up everything I need to make this! It looks delicious and I can’t wait to have it for dinner tonight!
Yay, hope you love it!