This is the ultimate guide for making homemade ravioli from scratch. Complete with step by step photo instructions and lots of helpful tips from what tools to use to what filling to choose. This guide will help you make them perfectly!
Making homemade ravioli can be a little labor intensive but it's absolutely worth it, silky buttery fresh pasta filled with an incredible filling and tossed in a beautiful sauce.
It just doesn't get any better and believe me the more you practice making homemade ravioli the easier it becomes!
This is the ultimate guide so we're going to cover everything from what tools you'll need plus incredible recipes you won't want to miss.
Tools You Need to Make Ravioli
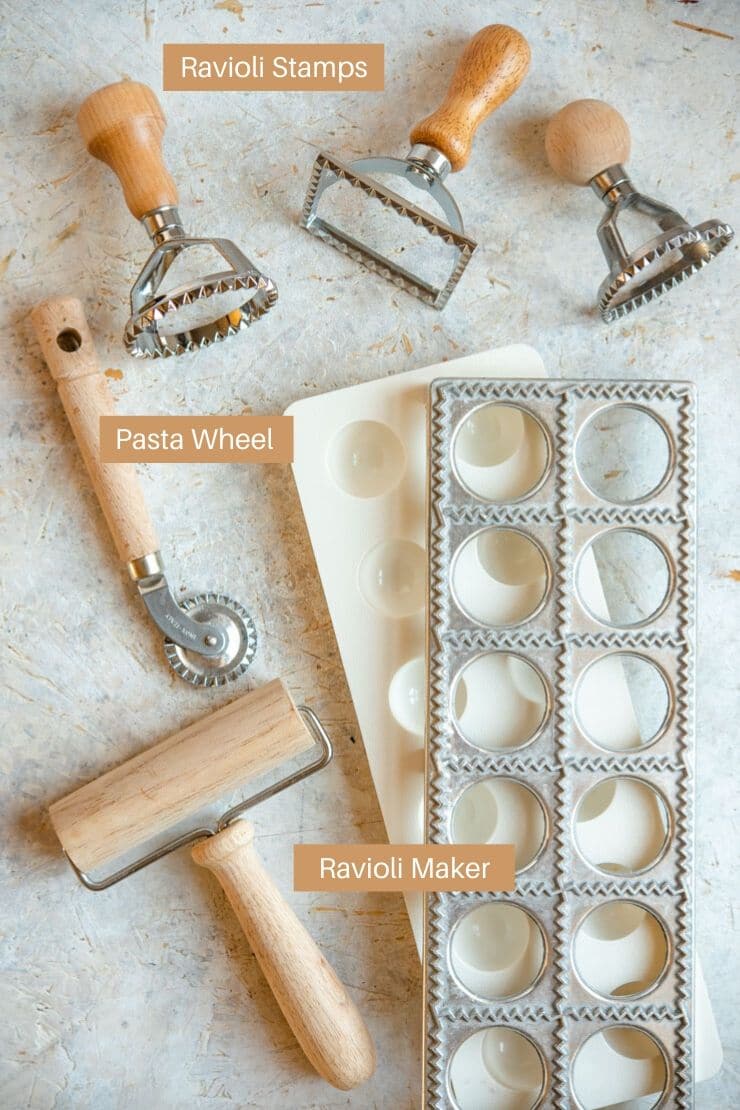
There are 3 main tools you can use to make homemade ravioli, it just depends on the shape you're looking for.
*This post contains affiliate links (paid links)*
- Ravioli Wheel or Pasta Wheels - this is a small wheel with a crimped edge that you use to cut hand filled ravioli. The size and shape are up to you!
- Ravioli Stamps or Cutters - ravioli stamps come in all different shapes and sizes the most common shapes are square and circle. Place the stamp over the filled pasta and use it to cut out the ravioli.
- Ravioli Maker - this is a super helpful tool and really helps keep the ravioli uniform if that's what you're looking for. See more details on how to use it in the How to Fill and Seal Ravioli section.
Never Miss A Recipe!
Get all the latest recipes and Italian content sent straight to your inbox (plus our top 10 Italian cooking secrets!)
Making the Pasta
The secret to the BEST homemade ravioli is, of course, great pasta!
Before you start making the ravioli you'll need to make homemade egg pasta dough.
Follow our guide for How to Make Homemade Pasta Dough it's my go-to recipe and it's so easy to make. I've got lots of tips on making it plus what flour you should use!
Top Tip: Having a pasta machine is a HUGE time saver and I totally recommend getting one but you can totally make homemade pasta with nothing other than a rolling pin and some elbow grease!
How Thin Should I Roll My Pasta Dough?
When using my pasta machine I like to roll my pasta out to number 7 which is the 3rd thinnest setting (9 being the thinnest).
That way the pasta still has a nice bite to it and it's a little easier to handle and fill.
If in doubt just roll the pasta out to the thinnest setting possible or roll it as thin as you can, that's the general rule! Once you get used to making ravioli you'll find out what thickness you prefer.
How to Choose A Filling for Homemade Ravioli
When it comes to making the ravioli filling there are some important tips to remember;
- Make sure it's not too wet - the filling should always be paste like or the consistency of ricotta or cream cheese (not too wet). If the filling is saucy or overly wet then the fresh pasta will turn sticky and will most likely stick to your work surface.
- It shouldn't be too rough - just like the filling shouldn't be too wet it also shouldn't be too rough. A rough filling could puncture the pasta which would be a disaster when you boil them. The filling will seep out or too much water will get in making the ravioli tasteless.
Here are some of my favourite fillings and ideas for you to try;
- Mushroom ravioli with parmesan cream sauce (a super popular recipe)
- Butternut squash
- Spinach and ricotta
- Burrata
- Stracchino
- Prosciutto
How to Fill and Seal Ravioli - 3 Ways
Using a Ravioli Maker
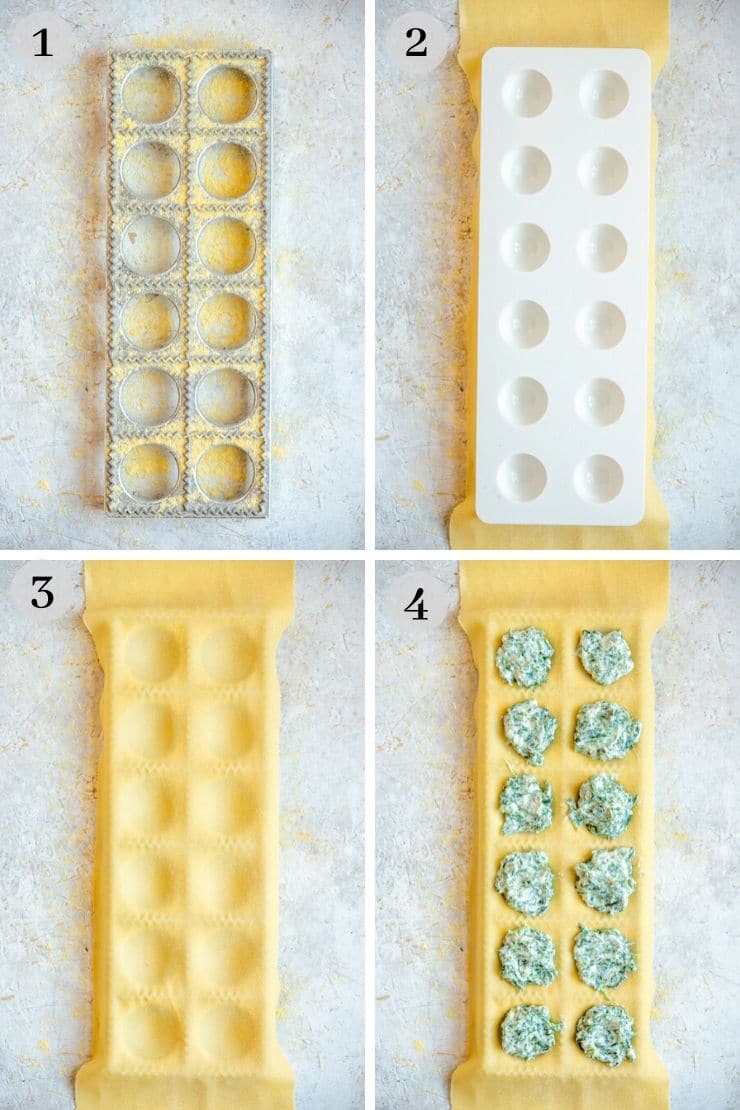
One important tip when using a ravioli maker is to dust it lightly with semolina or 00 flour to stop the pasta sticking to it (I've had a few disasters when I've forgotten to do this) (photo 1).
Place your sheet of pasta directly over the ravioli maker making sure there is enough overlap on all of the edges.
Place the plastic dimples over the sheet of pasta and very lightly press to make little pockets for your filling (photos 2 & 3).
Fill the pockets with your desired filling (1 heaped teaspoon is usually enough) (photo 4).
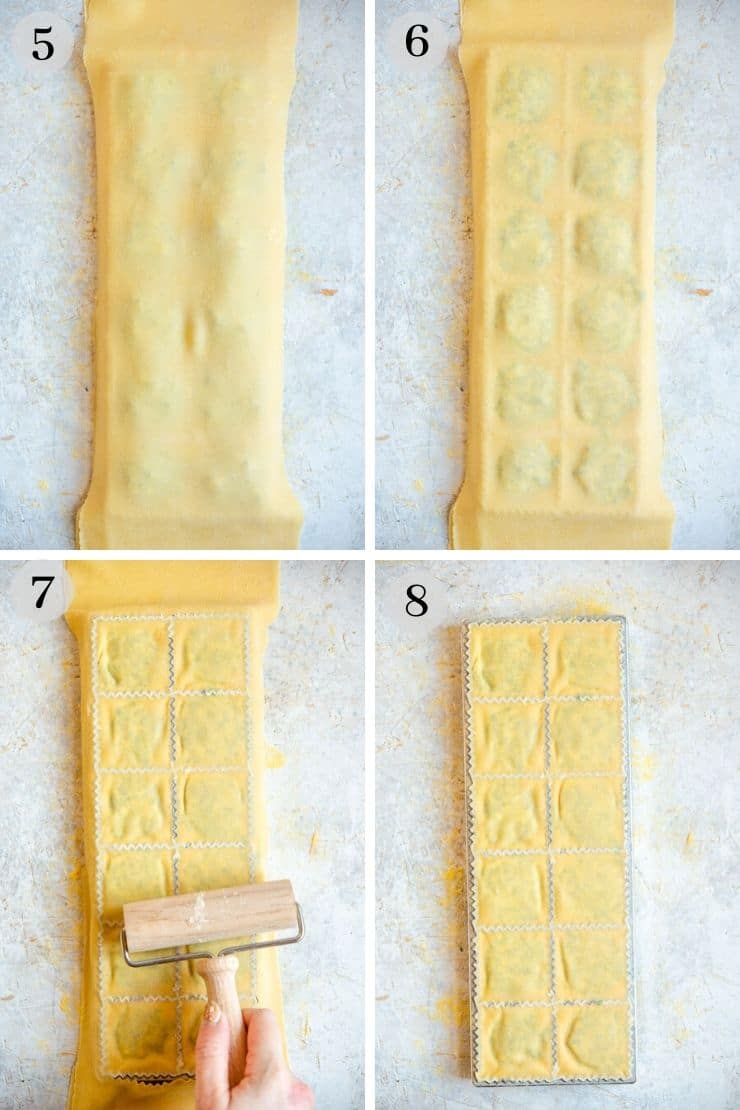
Next, place your second sheet of pasta directly over the first and lightly push down to get rid of any air (photo 5 & 6).
Use your mini roller to roll over the ravioli maker until the pasta is cut around the edges (photo 7).
Remove the excess pasta dough from around the ravioli maker and turn it over to remove the ravioli (photo 8).
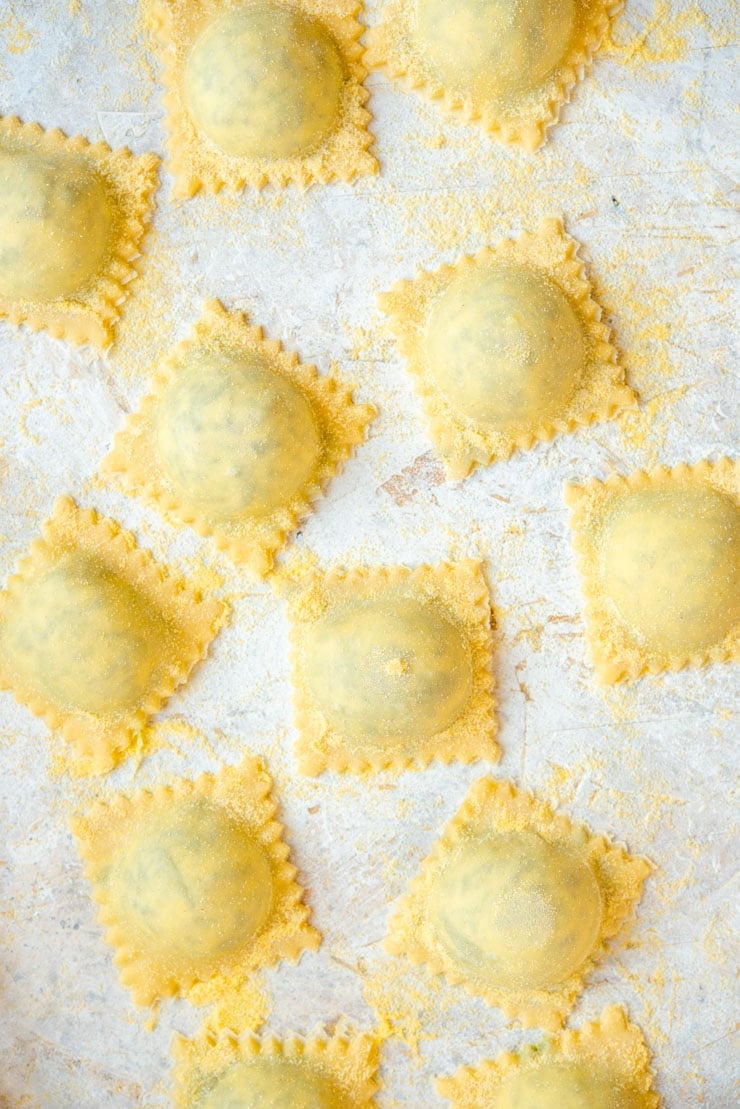
When they fall out you should have perfectly filled ravioli ready for cooking!
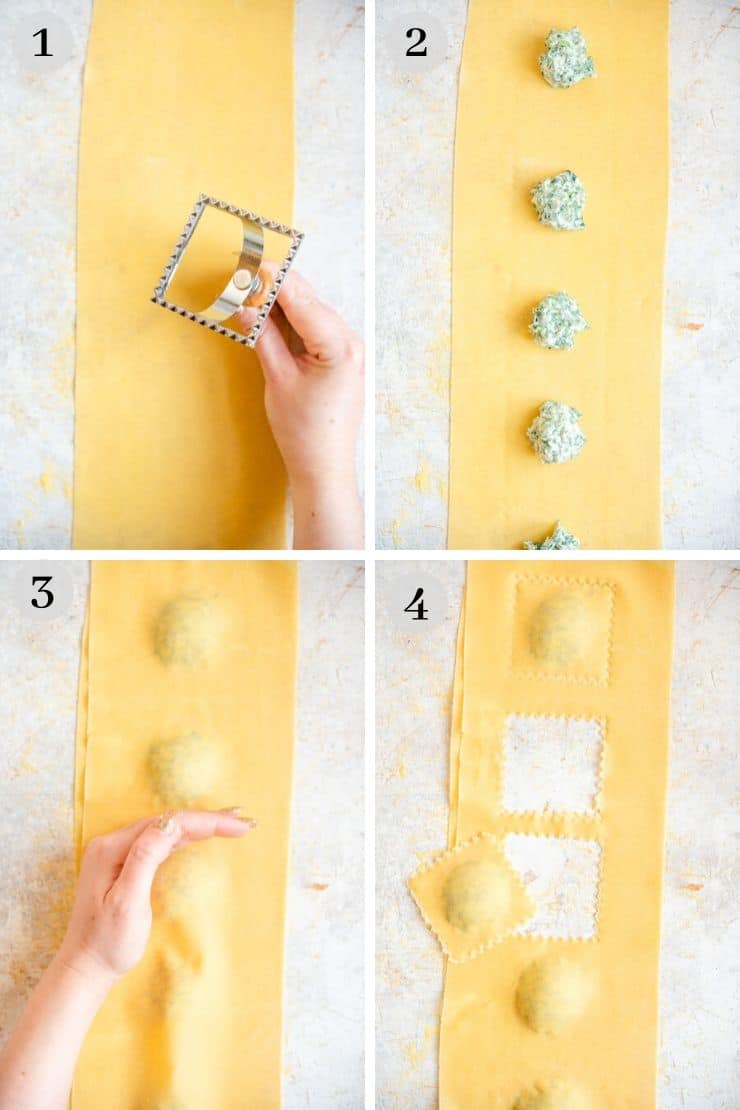
Using a Ravioli Stamp
Lay your sheet of pasta on a clean surface dusted with semolina flour.
Lightly press your stamp of choice onto the pasta so you have a rough guide of where to put the filling. You only want to mark the pasta and not cut it (photo 1).
Place the filling (around 1 heaped tsp) in the middle of each ravioli mark (photo 2).
Next, place a second sheet of pasta directly over the first and use your hands to cup around the filling. Press lightly as you go to seal the pasta together and get rid of any air (photo 3).
Top Tip: If your pasta has trouble sticking together then you can dab it very lightly with water to seal.
Finally, use your stamp of choice to cut out each ravioli and they're done (photo 4).
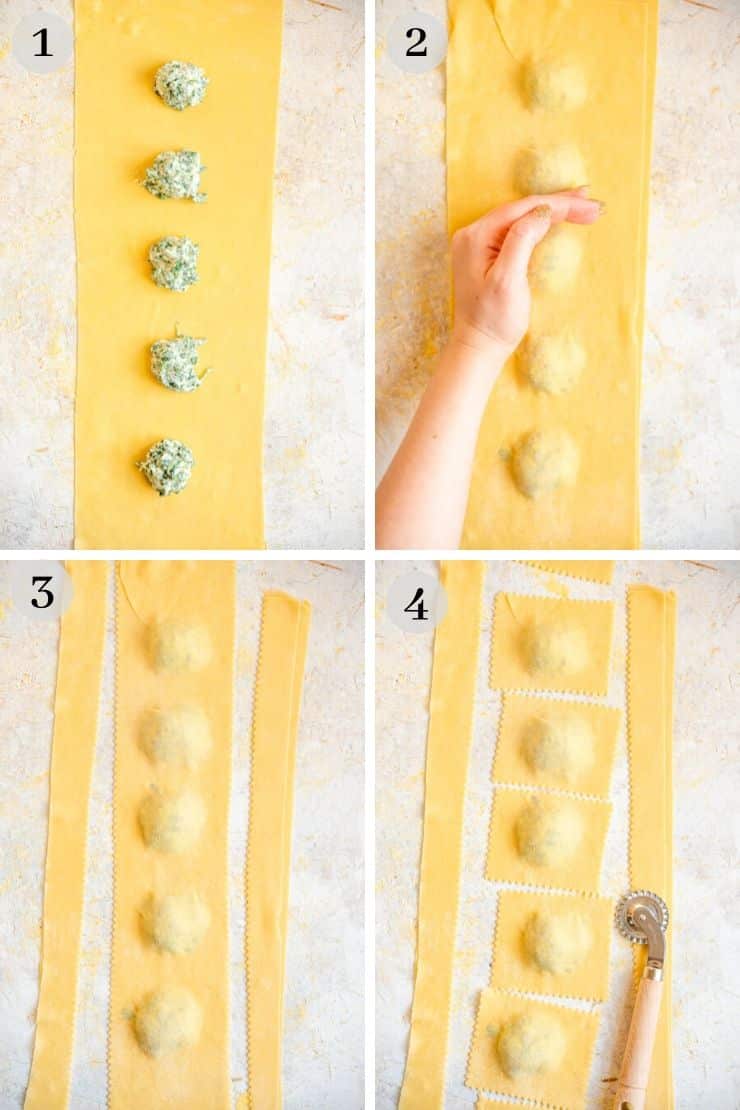
The Free Hand Method (with a pasta wheel)
Lay out one sheet of pasta and space your filling of choice around two finger spaces apart (photo 1)
The amount of filling will depend on the size of ravioli you want to make but I usually go for 1 heaped teaspoon per ravioli.
Next, lay your second sheet of pasta directly over the first and lightly cup your hands around the filling, pressing lightly to seal whilst pushing out any air (photo 2).
Finally using a pasta wheel cut the sides of the ravioli and cut them into individual squares. You can neaten them up and make them smaller once cut (photos 3 & 4).
Top Tip: If you don't have a pasta wheel you can use a pizza cutter or knife but you won't get the nice crimped edges.
Tips on Choosing the Best Sauce
When you choose a sauce for ravioli it can anything from an Authentic Italian Tomato Sauce, Herby Garlic Butter Pasta Sauce, cream sauce or even ragu!
The list is endless, I particularly love this parmesan cream sauce that we used in our mushroom ravioli, so delicious!
The main this to remember is that the sauce shouldn't overpower the filling!
Can You Make Homemade Ravioli in Advance?
If you're making the ravioli only a couple of hours in advance then you can sit them on a board or plate dusted with semolina flour and covered with a clean kitchen towel.
If you are making the ravioli a day or more in advance then you need to freeze them.
To Freeze Ravioli - lay them flat on an even layer and freeze, once frozen you can transfer them to a ziploc bag to save space. That way they won't stick to each other.
To Cook from Frozen - there's no need to thaw or defrost the ravioli before cooking in fact if you do that they will probably all stick together. Simply cook straight from frozen in salted boiling water.
Top Tips for Making Homemade Italian Ravioli
- Make sure to have plenty of semolina flour to stop the ravioli sticking as you're making them.
- You can use flour instead of semolina to stop the pasta sticking but it does dry the pasta out quickly.
- Make sure that your filling of choice is not too wet or rough, it should always be smooth and not have any sharp edges.
- You can find my go-to recipe for homemade pasta dough here
- All of the tools I've mentioned above will make the process of making homemade ravioli much easier but you can get the same results with just a rolling pin and a knife, cookie cutter or pizza wheel (and a little extra effort).
More homemade pasta recipes to try
- Lobster Ravioli with Vodka Cream Sauce
- Mushroom Ravioli With Parmesan Cream Sauce
- Butternut Squash Ravioli with Sage and Brown Butter Sauce
- Homemade Agnolotti (step by step)
If you’ve tried making your own Homemade Ravioli or any other recipe on the blog please let me know how you got on in the comments below, I love hearing from you! You can also FOLLOW ME on FACEBOOK, INSTAGRAM and PINTEREST to see more delicious food and what I’m getting up to.
☆Full Recipe
How to Make Ravioli
Ingredients
- 1 batch homemade egg pasta dough
- semolina flour for dusting
- filling of choice see notes for filling ideas
Equipment
- Pasta wheel
- Ravioli stamp
- Ravioli Maker
Instructions
Using a Ravioli Maker
- One important tip when using a ravioli maker is to dust it lightly with semolina or 00 flour to stop the pasta sticking to it (I’ve had a few disasters when I’ve forgotten to do this).
- Place your sheet of pasta directly over the ravioli maker making sure there is enough overlap on all of the edges.
- Place the plastic dimples over the sheet of pasta and very lightly press to make little pockets for your filling.
- Fill the pockets with your desired filling (1 heaped teaspoon is usually enough).
- Next, place your second sheet of pasta directly over the first and lightly push down to get rid of any air.
- Use your mini roller to roll over the ravioli maker until the pasta is cut around the edges.
- Remove the excess pasta dough from around the ravioli maker and turn it over to remove the ravioli.
- When they fall out you should have perfectly filled ravioli ready for cooking!
Using a Ravioli Stamp
- Lay your sheet of pasta on a clean surface dusted with semolina flour.
- Lightly press your stamp of choice onto the pasta so you have a rough guide of where to put the filling. You only want to mark the pasta and not cut it.
- Place the filling (around 1 heaped tsp) in the middle of each ravioli mark.
- Next, place a second sheet of pasta directly over the first and use your hands to cup around the filling. Press lightly as you go to seal the pasta together and get rid of any air.
- Top Tip: If your pasta has trouble sticking together then you can dab it very lightly with water to seal.
- Finally, use your stamp of choice to cut out each ravioli and they’re done.
The Free Hand Method (with a pasta wheel)
- Lay out one sheet of pasta and space your filling of choice around two finger spaces apart.
- The amount of filling will depend on the size of ravioli you want to make but I usually go for 1 heaped teaspoon per ravioli.
- Next, lay your second sheet of pasta directly over the first and lightly cup your hands around the filling, pressing lightly to seal whilst pushing out any air.
- Finally using a pasta wheel cut the sides of the ravioli and cut them into individual squares. You can neaten them up and make them smaller once cut.
- Top Tip: If you don’t have a pasta wheel you can use a pizza cutter or knife but you won’t get the nice crimped edges.
Notes
- Make sure to have plenty of semolina flour to stop the ravioli sticking as you're making them.
- You can use flour instead of semolina to stop the pasta sticking but it does dry the pasta out quickly.
- Make sure that your filling of choice is not too wet or rough, it should always be smooth and not have any sharp edges.
- You can find my go-to recipe for homemade pasta dough here
- All of the tools I've mentioned above will make the process of making homemade ravioli much easier but you can get the same results with just a rolling pin and a knife, cookie cutter or pizza wheel (and a little extra effort).
- Nutrition is calculated without the filling.
Ravioli filling and sauce ideas
Nutrition
- I always use extra virgin olive oil in all of my recipes unless stated otherwise
- When I use canned or jarred tomatoes of any kind I always use Cirio or Mutti brands for the best results and flavour.
- All vegetables are medium sized unless stated otherwise
- All recipes are tested and developed using a fan (convection) oven
- Find out more about how nutrition is calculated.
- Check out our must have Italian Pantry Staples.
- You can also find all our Essential Kitchen Tools for Italian Cooking.





Janice
Hi, Emily. I've just discovered your wonderful website, and I'm having a lot of fun navigating thru your recipes. I want to first try your Mushroom Ravioli. I have a Kitchenaid roller, so I'm not sure what setting I should roll the sheets to. I usually use 6 for lasagna noodles. I realize ravioli will have two layers of pasta at the edges, so I don't want to roll too thick...but neither do I want to go too thin, so the filling doesn't fall through. Suggestions?? Roll till I see my counter pattern through the dough?
Emily
Hi Janice, so happy you’ve found us! I’m not familiar with the KitchenAid roller but if number 6 is for lasagne sheets I’d say try using setting 6 or 7 (I’d try number 7 first). Hope you enjoy the ravioli 🙂
Tamara
Hi Emily! I love your pasta recipe. It was so perfect the first time I made it. I am about to make ravioli now, but I have a question regarding the thickness. Your pasta machine has 9 settings. My Marcato Atlas 150 only has 7 (made in 1994). Which setting (on a 7 setting machine) would you recommend for the ravioli? I've looked online for comparisons and measurements...no luck. The Marcato website only shows the thickness on the 9 setting Atlas. I have no idea if these are thinner or if I should use the 7 on my old Atlas. I would so appreciate your advice!!! Thank you!!!
Simone
Genious!