This post may contain affiliate links. Please read our disclosure policy.


This is my absolute favourite no-knead focaccia recipe. It’s so bubbly, light, and airy with the most delicious flavour and golden crust. Best of all, it’s super easy to make and can be prepped up to 48 hours in advance. Enjoy it as it is, with any toppings you like or use it to make incredible focaccia sandwiches!
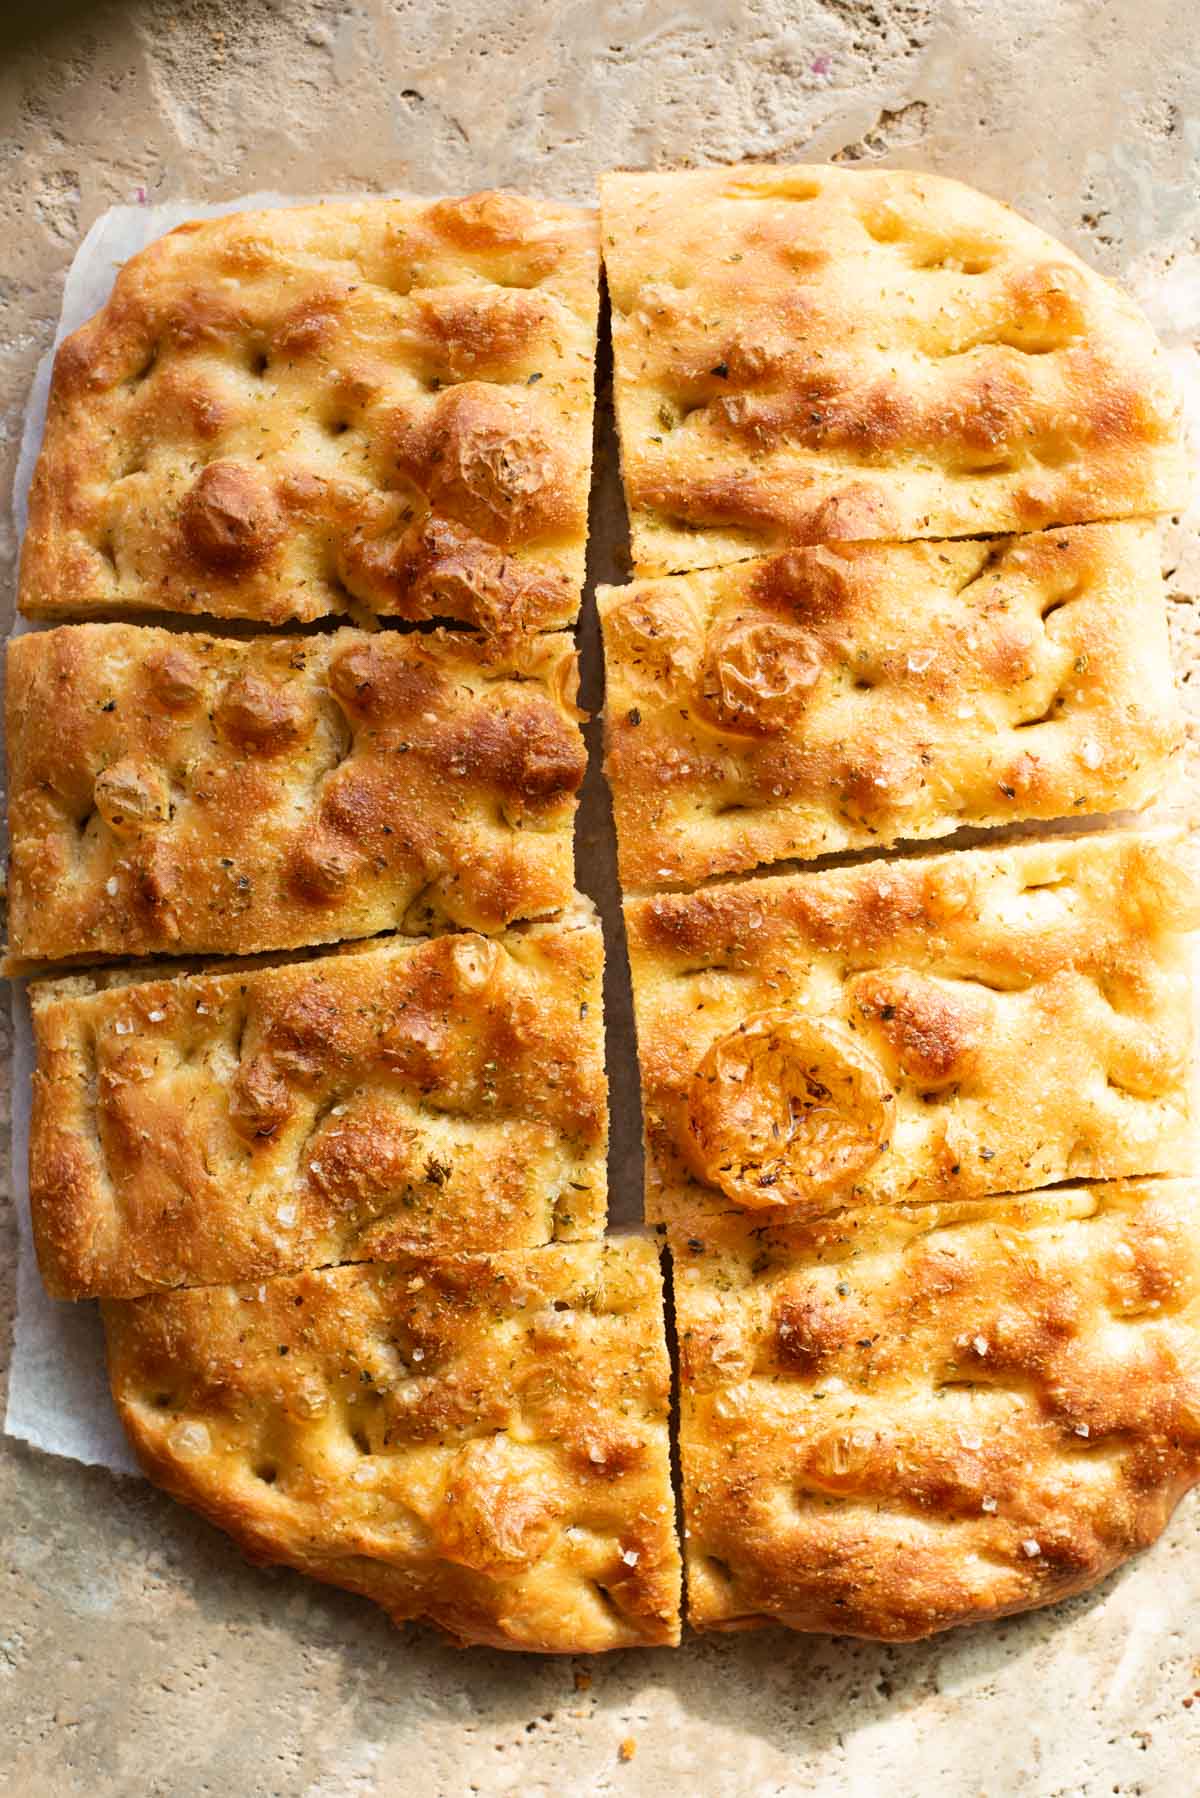
Table of Contents
Why this is my favourite focaccia recipe
- High hydration (80%), which makes this focaccia super light, bubbly and airy with a delicious golden crust!
- It uses minimal yeast (easier to digest).
- No kneading involved (we use a simple folding technique).
- It’s perfect for prepping ahead (can be made 48 hours in advance).
Although I’ve been making focaccia for years, I recently changed my technique, experimenting with different hydrations, and I have learned so much.
Our other focaccia recipe on the site has a lower hydration (60%) and a lot more yeast involved because it’s a same-day dough.
This recipe is my new go-to and I use it as a snack, for dipping in sauces, soups (scarpetta), making sandwiches or with various toppings – it’s unbelievably delicious!
This post is quite lengthy due to it being a technical recipe, and I wanted to be very thorough in explaining the steps visually, providing a short video to explain the folding techniques and giving you all the necessary tips.
Use the table of contents to skip to the section you need or jump right to the recipe card here.
My top tips (what I’ve learned)
Here are some of my top tips that I’ve learnt since diving deeper into focaccia making. The full written recipe is in the recipe card below. I’ve also included a handy short video to show you how to do the folding techniques (it’s super easy).
- Minimal yeast is best – You need just a minimal amount of yeast, especially if you’re using instant or fast-action yeast. Large quantities of yeast are often used when you need or want a same-day dough but it can make the bread difficult to digest. Using minimal yeast and letting the dough proof for longer will stop you from feeling so sluggish afterwards.
- Time equals flavour – A longer proof is necessary when using a small amount of yeast, but it also gives the bread a chance to develop a lot of flavour, which it can’t do in a short amount of time.
- Put a timer on – there are 30-minute intervals between each fold, so put a timer on so you don’t forget about it (this is super important for me, otherwise I forget every time!).
- Don’t be scared of wet dough – High hydration, meaning a high water to flour ratio, means the dough will be wet and sticky and can’t be kneaded easily. Since this dough has an 80% hydration, we used a stretch and fold method, which is really easy to do (see the photos and video tutorial).
Ingredient notes

Pin this now to find it later
Pin It- Italian 00 flour with 12% protein – you can also use bread flour for this recipe, which will work just as well.
- Instant yeast – the yeast we use can be added straight to the flour without activation, but some fast-action or instant yeasts need some water to help them along. Make sure to read your packet instructions in case you need to activate your yeast first.
Visual walk-through of the recipe
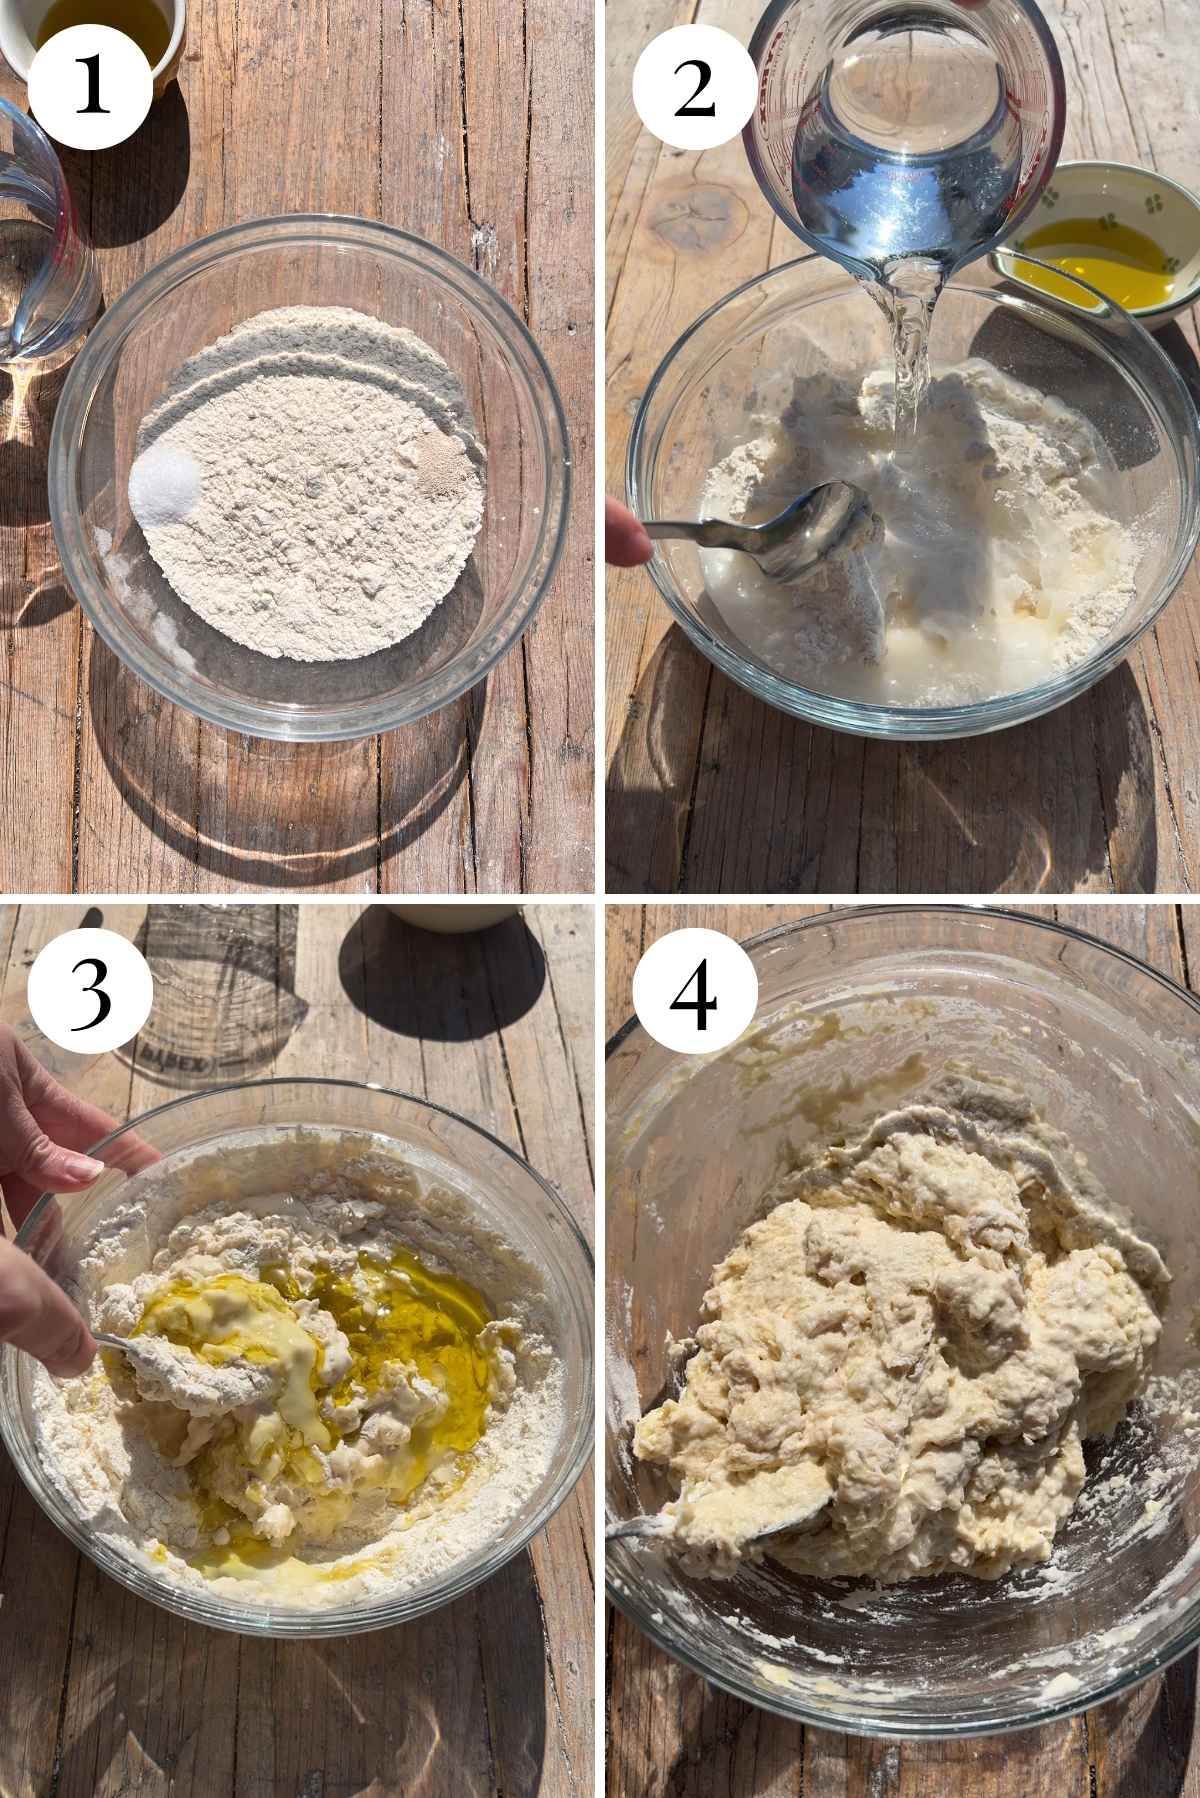
Step 1 – put the flour in a large mixing bowl with the salt and yeast at opposite ends (photo 1).
Step 2 – add the water and start to mix the dough a little with a spoon then add the oil. Keep mixing the dough until there are no dry bits of flour left. Cover and leave at room temperature for 30 minutes. (photos 2-4).
Step 3 – now it’s time to do a stretch and fold. To do this, wet your hand then grab one edge of the dough pull it up gently and fold it into the middle of the dough. Repeat this all the way round the dough then cover the dough and leave it for another 30 minutes (photos 5 and 6).
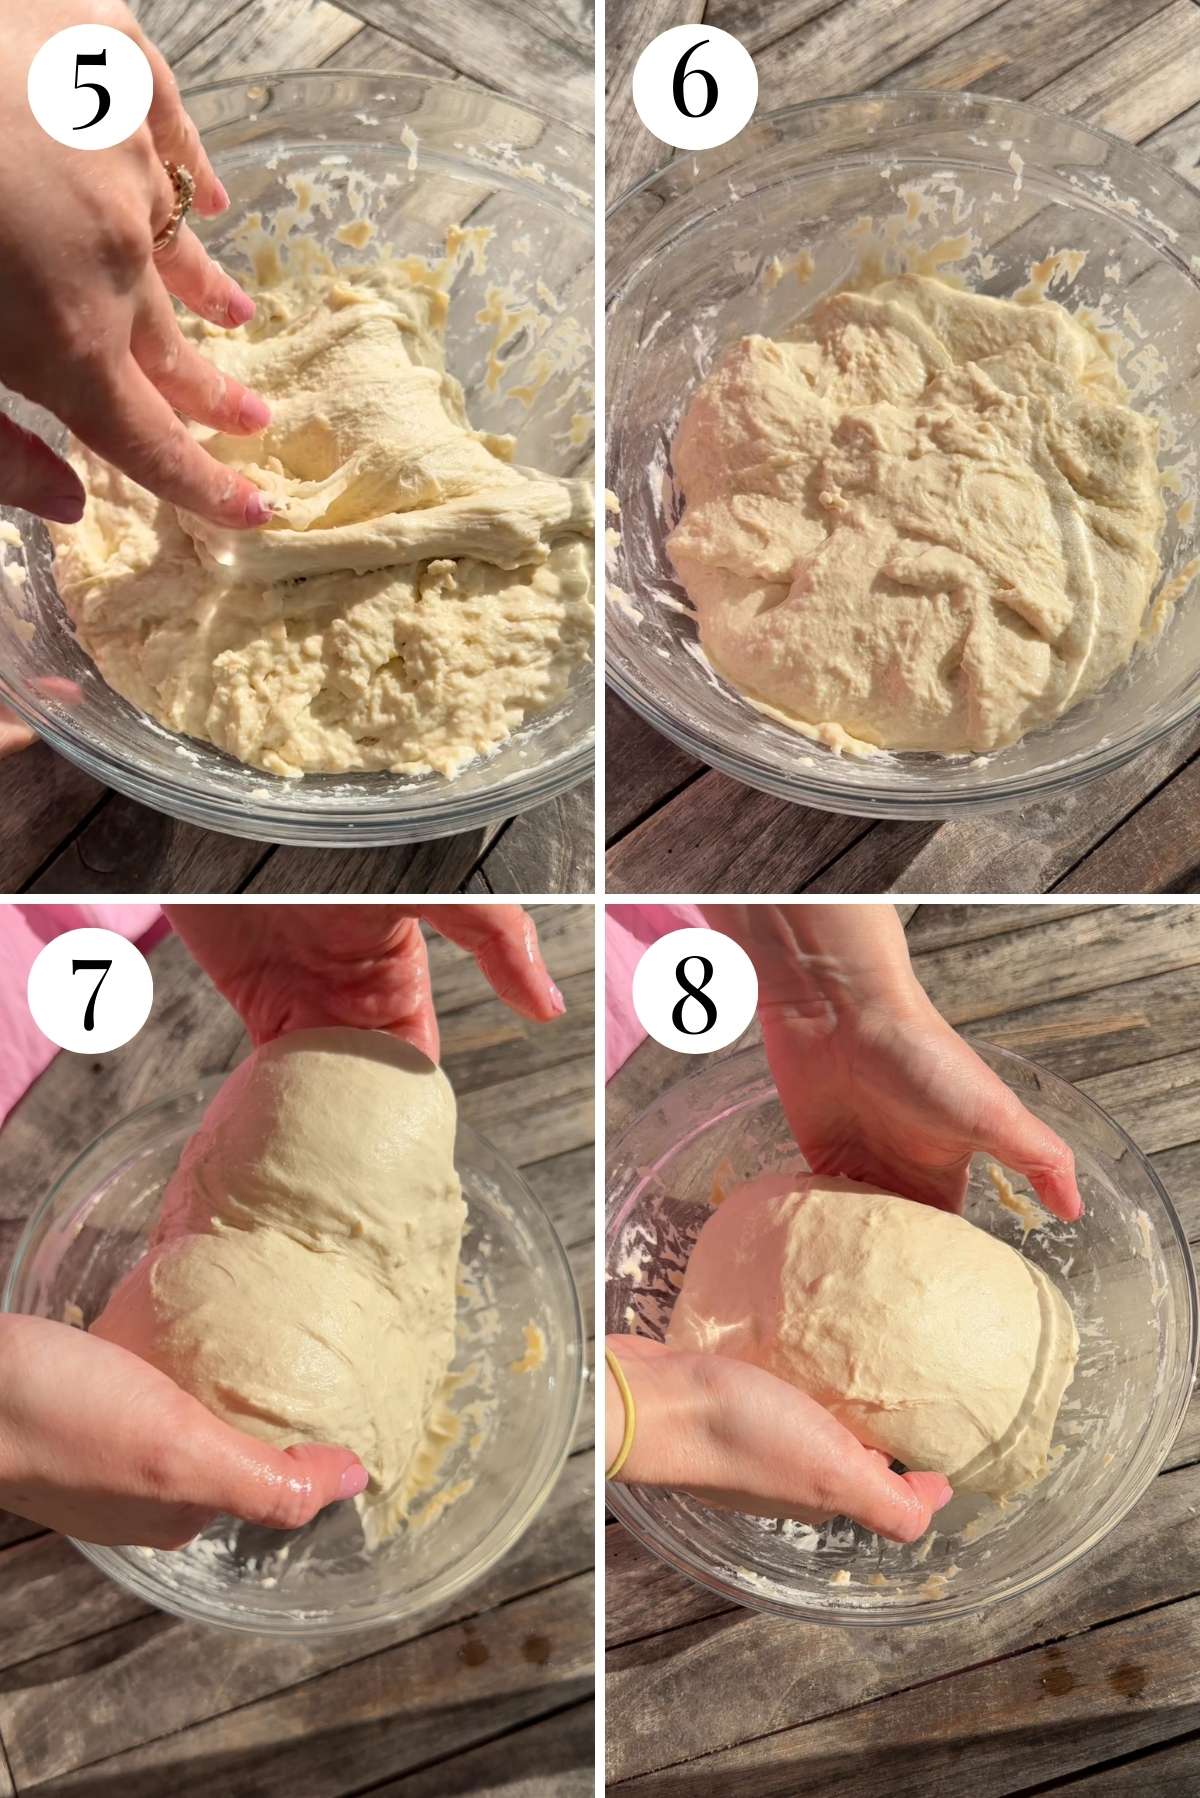
Step 4 – Now it’s time to do your first coil fold. This is very simple but sounds more complicated than it is written out so I highly recommend watching the short video of me doing this in the recipe card below.
To do the coil fold, wet both hands well then gently pick the dough up from the middle and stretch it up. Let it fall back down and repeat the step until you can lift the dough right out of the bowl. Let the dough fall back down with the ends folding in on themselves. Turn the bowl and repeat this from the opposite edge (photos 7 and 8).
Cover the dough and let it rest for another 30 minutes before repeating this step another twice with 30 minutes rest in between. Place the dough in the fridge and leave it overnight or up to 48 hours.
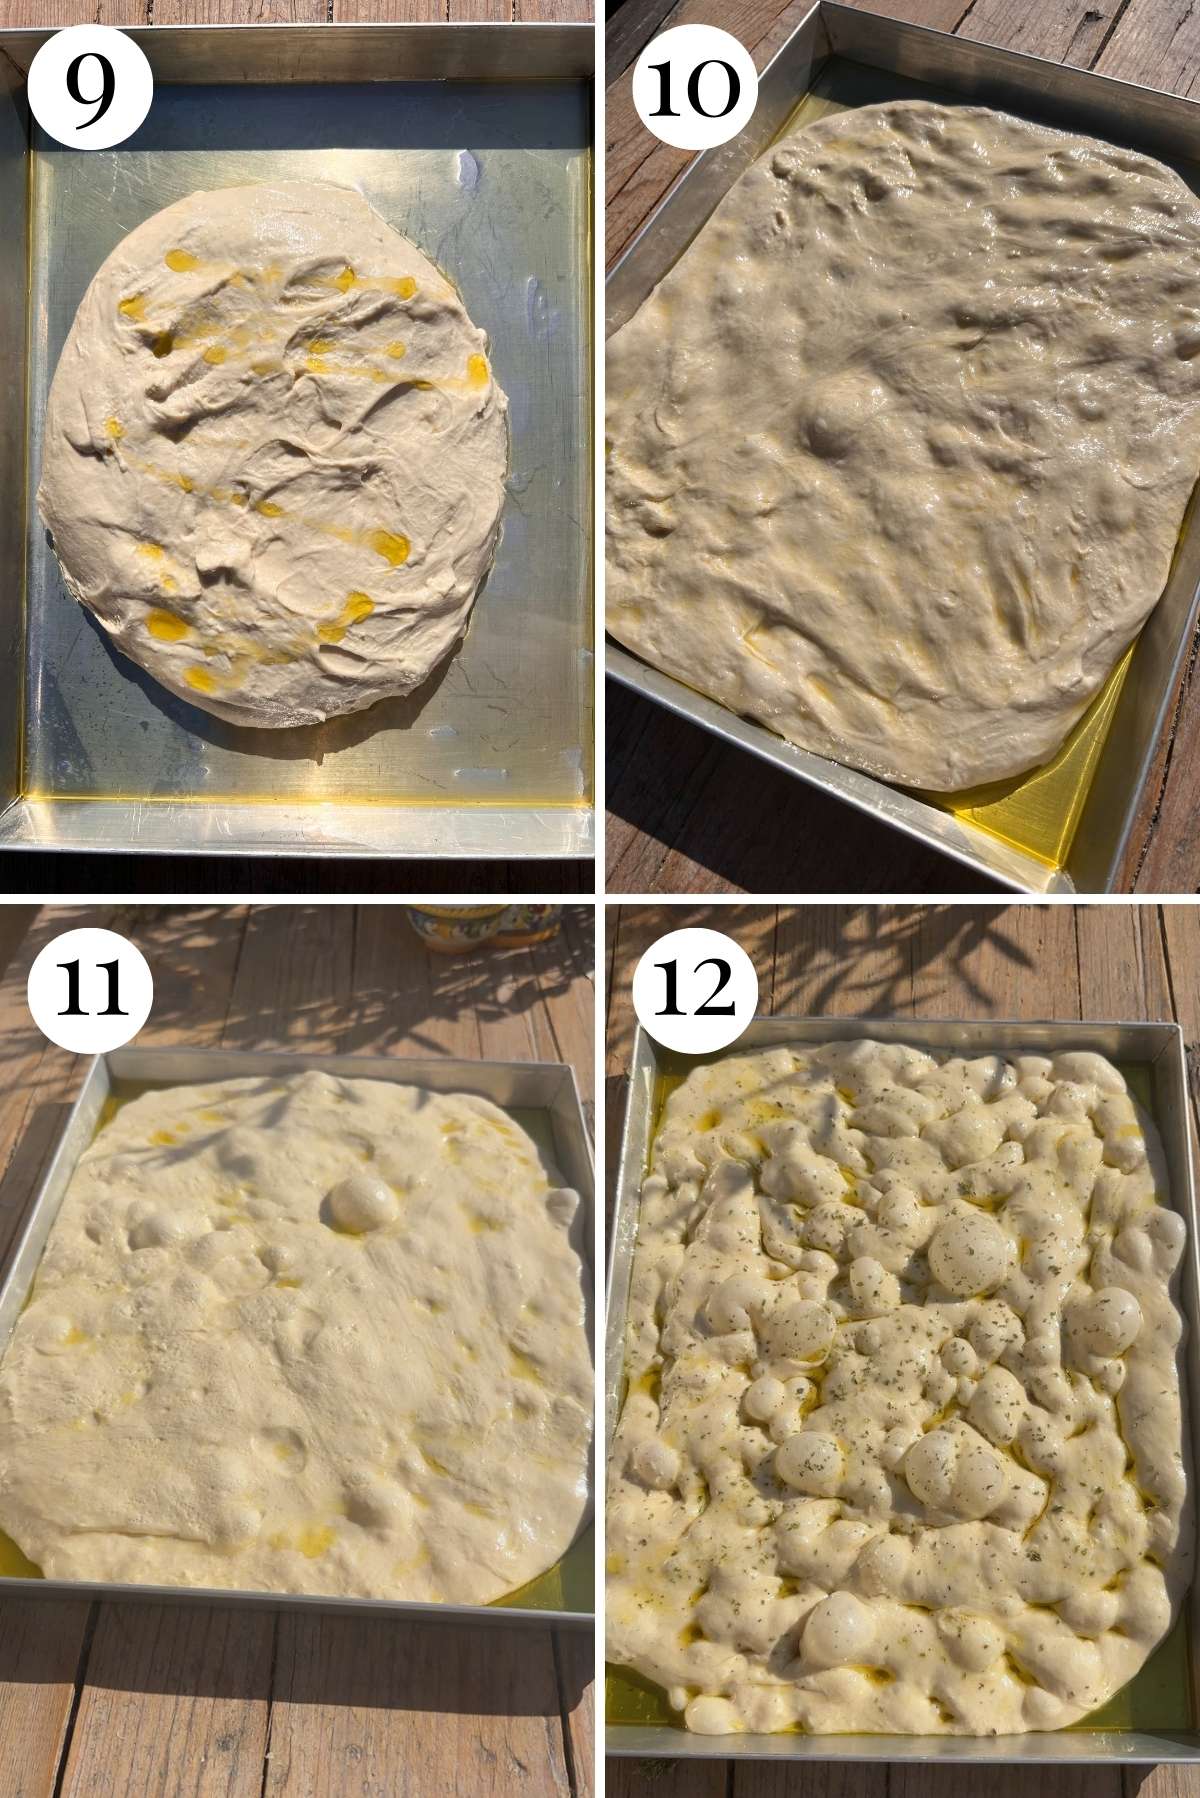
Step 5 – Grease your baking tray well with olive oil and oil your hands. Remove the dough from the bowl to the tray and gently spread it out to fit the tray as best as you can. Drizzle it with more oil and cover it with plastic wrap. Let it proof until doubled in size (about 2-4 hours) (photos 9-11).
Step 6 – After proofing, oil your hands and create dimples all over the dough by gently pressing your fingertips all over the dough (photo 12). Sprinkle with salt and herbs if using then bake in the pre-heated oven (230C/450F) for 20-25 minutes until golden brown all over.
Example baking timeline
I thought it would be helpful to show you my usual timeline for making my no knead focaccia.
- 5:30 pm – mix up the focaccia dough
- 6:00 pm – stretch and fold
- 6:30 pm – coil fold 1
- 7:00 pm – coil fold 2
- 8:00 pm – coil fold 3 (put in the fridge overnight)
- 8:00 am next morning – remove from the fridge and put into tray
- 12:00 pm – bake.
Just note that the temperature of your environment will determine how long you need to leave the dough to proof. In summer, for example, your dough may be doubled in size by 10 am and not need to go to 12 pm.

Focaccia flavour variations
The flavour variations and toppings when it comes to focaccia are endless and you can experiment with whatever you like or have at home. Here are some delicious combinations you can try or see our Italian Bread Category for more inspo!
- Olive focaccia – simply add some olives to the dough after you’ve done the dimpling. Choose whatever olives you like (we love Nocellara, Kalamata and Castelvetrano) and you can choose to keep them whole or slice them.
- Tomato – there are a few different ways to create a tomato focaccia. You can simply spread over some tomato sauce (homemade please, don’t make homemade focaccia and use store-bought sauce), add sun-dried tomatoes or roasted or raw cherry tomatoes sliced on top.
- Herbs – I love sprinkling over some Italian oregano that I buy dried in bunches. Rosemary is another regular herb I use and love but you can experiment with whatever you like.
- Onions – either thinly slice raw onions (whatever kind you like) and place them on top of the focaccia. You can also add caramelised onions which are absolutely delicious!
- Garlic oil or butter – crush some garlic and melt it in butter or olive oil then pour it over the focaccia before baking.
- Potato – this is a classic topping in Italy. See our cheesy potato pizza recipe and use the same topping with this dough!
FAQs
You can, but it will require more yeast (at least 4 grams or 1 teaspoon). Make the dough as early as possible, then after you have completed all the folds, leave it to rise at room temperature until doubled or even tripled in size.
The maximum time I’d leave it is 48 hours. This is because after 48 hours, the dough will start to over-proof and will turn out a lot flatter if you bake it.
Yes, complete your folds, giving the dough at least 2 hours at room temperature, then freeze it in a container. Defrost the dough completely in a bowl and allow it to come to room temperature before baking.
More delicious Italian breads to try
Bread & Savory Bakes
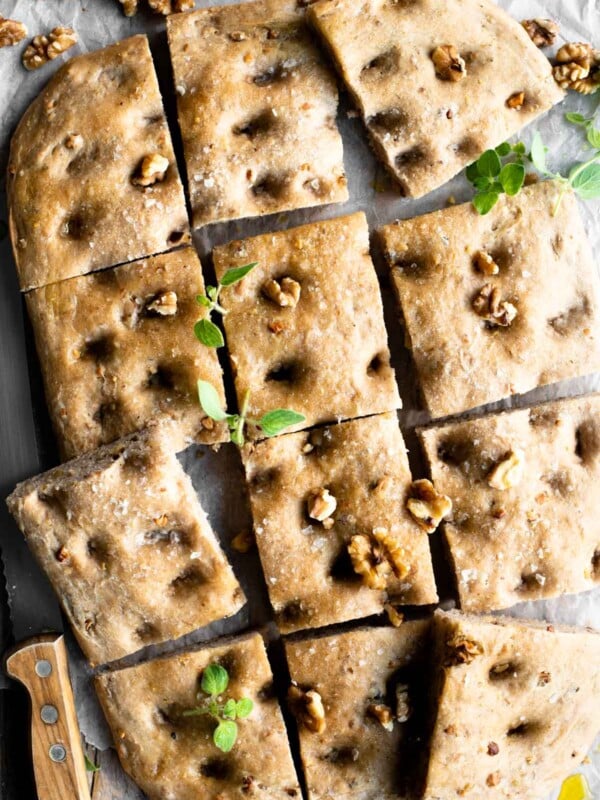
Walnut Focaccia
Bread & Savory Bakes
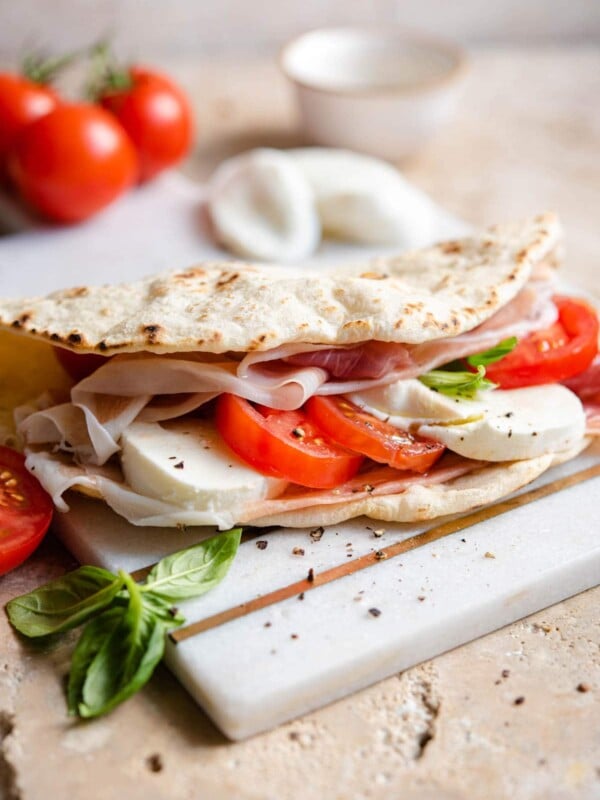
La Piadina: Italian Flatbread

Bread & Savory Bakes
Cherry Tomato Focaccia with Anchovies and Oregano

Pizza
Focaccia Pizza
If you’ve tried this Overnight No Knead Focaccia Recipe or any other recipe on the blog then don’t forget to rate the recipe and let me know how you got on in the comments below, I love hearing from you! You can also follow us on Facebook, Instagram and Pinterest or sign up to our Newsletter to see more of our delicious food.
Step By Step Photos Above
Most of our recipes come with step by step photos, helpful tips and tricks to make it perfectly first time and even video!
Easy Overnight No Knead Focaccia Recipe

Equipment
- 11×14 inch Baking tray
- large mixing bowl
Ingredients
- 500 g Italian 00 flour or bread flour, (approx 3 and 3/4 cups spooned and levelled)
- 400 ml water, (1 and 2/3 cups)
- 1 g instant yeast, (¼ teaspoon) Please see notes
- 4 tablespoons olive oil , plus more for greasing and topping
- 7 g salt , plus sea salt flakes for topping
Instructions
- Put the flour (500g) in a large mixing bowl and place the yeast (1g) and salt (7g) at opposite ends of the bowl. Please check your packet instructions to see if you yeast needs activated in water first (see notes).
- Add the water (400ml) and stir in to form a rough dough. Add the olive oil (4 tablespoons), then continue to stir the dough with a spoon until there are no dry bits left. It should look very wet and sticky.
- Cover the bowl with plastic wrap and leave it to rest for 30 minutes.
- Next, uncover the bowl and wet your hands well with water. Using one hand, fold each edge of the dough into the middle (see photos or video for reference). This takes just a few seconds. Re-cover the bowl and let it rest for another 30 minutes.
- Repeat the step above once more then leave it again for 30 minutes.
- Next, wet your hands again and do a coil fold. To do this, pick the dough up from the middle and stretch it right up until to feel the edges start to come away from the bowl, release the dough then do this again up to 3-4 times until you can lift the dough right out of the bowl without tearing it. Place the dough back in the bowl letting the ends fold in on themselves. Repeat it from the opposite edge you started with (I recommend watching the quick video below as this is a very simple technique but can sound so complicated written out). Let the dough rest for another 30 minutes then repeat this another twice with 30 minutes rest in between.
- Cover the bowl and refrigerate it overnight or up to 48 hours.
- Remove the dough from the fridge and put it in a well-oiled baking tray. Drizzle more olive oil over the top then place more plastic wrap over the tray. Let the dough proof at room temperature until almost doubled in size (don’t put it near any direct sun or high heat).
- Pre-heat the oven to 230C (450F). Oil your hands well then create dimples all over the dough using our fingers, try not to burst any air bubbles.
- Sprinkle over some sea salt and any herbs you like then give it another light drizzle of olive oil. Bake in the oven for 20-25 minutes until golden brown.
- Remove from the oven, we like to drizzle more olive oil over it once baked but that’s optional. You can serve the focaccia warm or at room temperature.
- It’s best served the same day (see notes for storing leftovers).
Video
Notes
- Environmental temperature – the proofing time in the tray (next day) will depend on how warm your environment is. For example, in summer it may take 1.5-2 hours and in winter it could take 4-5 hours to double in size.
- Baking tray – you can use a smaller tray than 11×14 inch, but I don’t recommend using a larger one or your focaccia will be a lot thinner.
- Measuring in cups – when spooning flour into cups and levelling it off with a knife, I tend to get around 135g per cup, but this can vary greatly from person to person. I highly recommend using a scale to weigh your flour for this recipe.
- Instant yeast – some types of yeast need to be activated in water first. Make sure to read your packet instructions. If you do need to activate the yeast (usually 5-15 minutes before) that’s fine, just take the required amount of liquid from the amount needed in the dough to activate the yeast.
- Proofing time – the whole process of folding the dough gives the dough 2 hours to proof (don’t worry if you forget and it goes over this time – up to 4 hours is absolutely fine). I don’t recommend doing any less than 2 hours, as you need to give the yeast time to grow and develop.
- Leftovers and storage – the focaccia, like most breads, is at its best the same day they are made. Once cool, wrap it in foil to keep it as fresh as possible. The next day, if you’re focaccia feels a little dry, just wrap it in foil and put it in a pre-heated oven at 180C (350F) for about 10 minutes to soften it. It makes great sandwiches or bread for dipping, even the next day.
Helpful Info for All Recipes
- I always use extra virgin olive oil in all of my recipes unless stated otherwise
- When I use canned or jarred tomatoes of any kind I always use Cirio or Mutti brands for the best results and flavour.
- All vegetables are medium sized unless stated otherwise
- All recipes are tested and developed using a fan (convection) oven
- Find out more about how nutrition is calculated.
- Check out our must have Italian Pantry Staples.
- You can also find all our Essential Kitchen Tools for Italian Cooking.
Nutrition
Nutrition information is automatically calculated, so should only be used as an approximation.


This focaccia is so easy to make is very tasty. I topped mine with some dried herbs and garlic before baking. Will make this again!
it sucks why take so long to rise. Duolingo recommended better recipe I use instead.
Hi Bob, did you make the recipe? Yeast needs time to develop before it goes in the fridge, at least 2 hours ideally but with this particular recipe and the method that’s used (folding) I found 3-4 hours to be the optimal time. It’s then put in the fridge to proof slowly. I use a small amount of yeast in this recipe which is better for digestion so that’s another reason for the longer proofing time. If you have a recipe you love already then that’s great!
Looks amazing, guys. Lazy cook that I am I haven’t tried folding a no knead dough, but I’m going to give it a go next time to experience the difference.
Ciao Frank, thanks so much! I really love this technique and watching the dough transform with such little effort.
Between “Instructions” and “Notes” the word “Video” appeared, but there was not a link to the video you mentioned. Well, at least on my Chromebook, it did not link to a video.
That said, your instructions, as usual, were quite clear. And there is no shortage of video’s showing stretch and fold techniques.
Hi George, thank you for letting me know. I’m not sure why that would be but I can see it on both desktop and mobile using chrome or safari browsers. I’ll look into it! Emily
I plan to try this soon. I’ve been working with pizza dough and found one I like, but am looking for a no-fuss focaccia. This looks delish! I did want to comment on lack of video. I was running Brave with an ad blocker and no video displays. When I switched to Chrome with no ad blocker, the video (and ads) appeared on my screen. That may be why some do not see the video link. Thanks for sharing the recipe and technique.
Hi Deb, thanks for letting me know. That makes sense since our some of our recipe videos are hosted through our ad partner.
Hi Emily, the photos alone of the top of your focaccia are incredible! I am going to try this when I get home tonight from work. I’ve been searching for a recipe that is lighter and less bread-y like the ones I bought in Italy when I lived there. I do like adding a salamoia wash on top of water, salt and good olive oil on top as it reminds me of my “other home”. Your butter and garlic sound similar and delicious. Thank you for a great site with truly authentic Italian recipes and stories. You are a breath of fresh air!
Thank you so much for your lovely comment! I love a salamoia on top too, it’s common in Liguria and one of the best I’ve ever tasted! I hope you love this one too 🙂